Last updated on
Creating a light-up glass bowl snowman is both easy and fun, because it allows you to add a personal, festive touch to your holiday decor.
Transform your living space into a winter wonderland with a charming DIY glass bowl snowman that sparkles with personality! Whether crafting with the family or adding that special touch to your holiday decor, this creative project blends simple materials like glass bowls, twinkling fairy lights, and an array of decorative accessories to bring your frosty friend to life.
Perfect for mantlepieces or as a festive centerpiece, follow along as we guide you through the steps to assemble, adorn, and illuminate your very own glowing snowman—an enchanting addition to any room.
Ready your materials and let’s embark on a magical craft journey that promises to brighten up those winter days!
Key takeaways:
- Gather glass bowls, fairy lights, snow/salt, adhesive, felt/fabric, ribbon/twine, buttons, trinkets
- Stack bowls, add ribbon and buttons, fill head with lights, add hat
- Glue bowls, balance, add arms and nose, draw/paste eyes and mouth
- Apply glue and glitter to bowls, stack and connect with adhesive
- Choose LED lights, layer snow and lights, distribute evenly, easy access
Materials for DIY Snowman With Lights
To craft a charming snowman that shimmers with light, gather the following essentials:
- Glass bowls: Three of varying sizes to stack and form the snowman’s body.
- Fairy lights: A set of battery-operated LED lights to create a cozy glow.
- Synthetic snow or Epsom salt: To simulate a wintry sparkle inside the bowls.
- Adhesive: Clear-drying, strong glue or double-sided tape to secure the bowls together.
- Felt and fabric: For making a hat and scarf to dress up your snowman.
- Ribbon or twine: To embellish and add detail to your creation.
- Decorative buttons: For the eyes, mouth, and front of the snowman.
- Trinkets: Optional items such as miniature brooms, tiny ornaments, or faux holly to personalize your snowman.
Each material plays its role in bringing the snowman to life; translucent bowls capture the light, while accessories add charm and character.
Instructions for Light Up Snowman
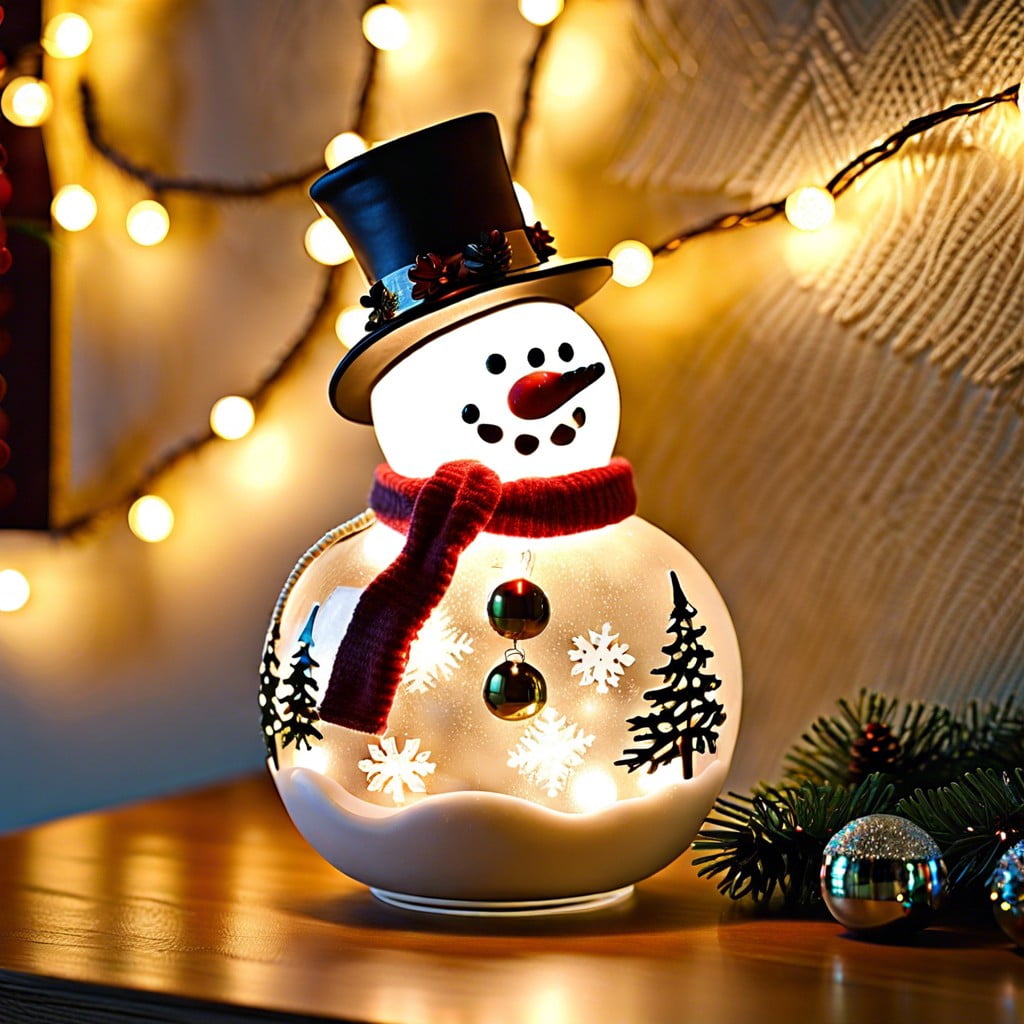
Begin by stacking the glass bowls from largest to smallest to form the snowman’s body, securing each with a small bead of hot glue.
Wrap the smallest bowl’s rim with a festive ribbon, creating a snug scarf, and then glue a few buttons down the front of the middle bowl for classic snowman detail.
For the head, fill the top bowl with a string of battery-operated LED lights, neatly arranging the battery pack so it’s accessible but hidden.
Fashion a simple hat from black cardstock or felt, attaching it to the head with a dot of glue to complete the charming face.
Carefully place the head atop the body, ensuring the light string remains orderly inside.
Finish by adding twig arms, a cute carrot nose from orange paper or felt, and draw or paste eyes and a smile to bring your snowman to life with a warm glow.
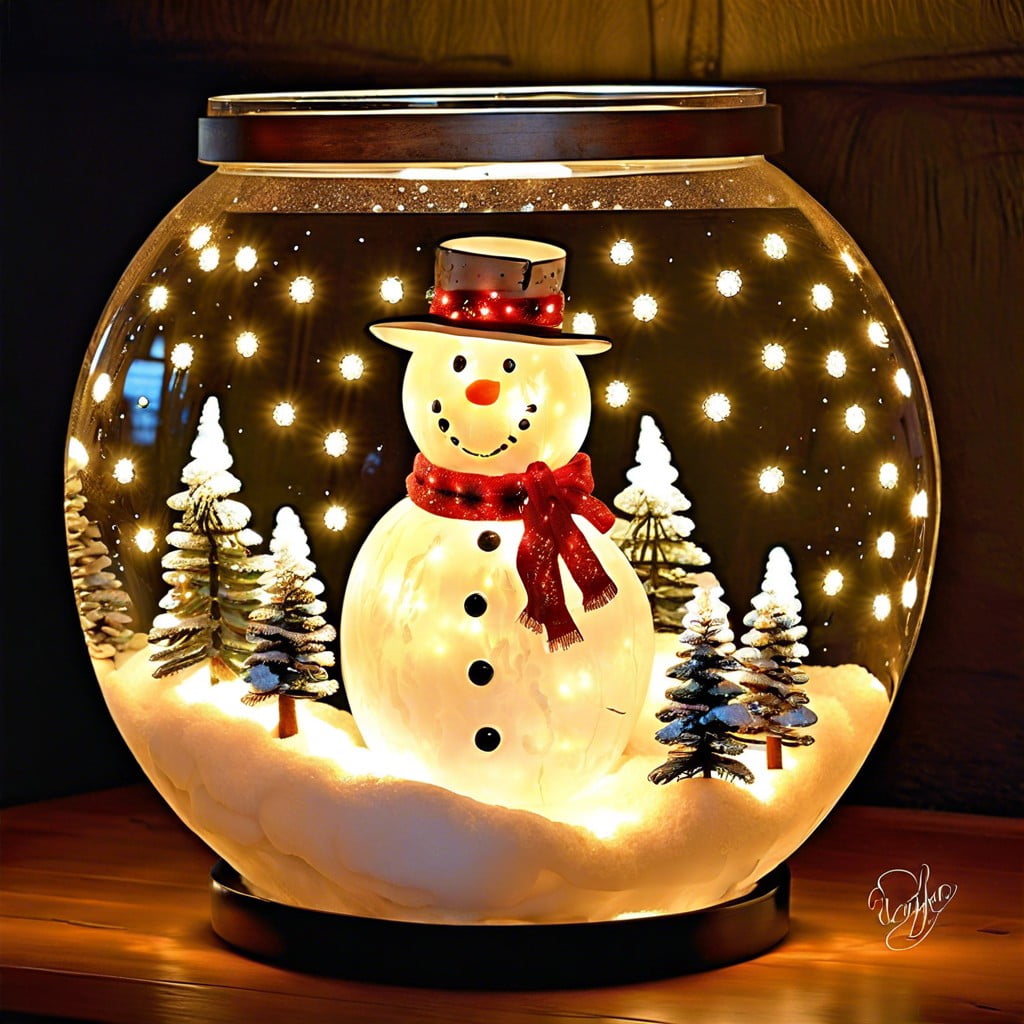
Putting Together the Glass Glitter Snowman
Once you’ve gathered your glitter, bowls, and adhesive, it’s time to assemble your sparkling snowman. Begin by applying a thin, even layer of glue on the outer surface of each glass bowl. Sprinkle your chosen glitter generously over the glue, ensuring full coverage for that winter wonderland sparkle.
Allow each bowl to dry thoroughly before stacking them to form your snowman’s body.
Connect the bowls using a robust, transparent adhesive to maintain the illusion of a seamless, snowy figure. If you’re incorporating lights, nestle a string of small LED lights between the bowls, arranging them to highlight your snowman’s curves. Secure the lights with clear tape if needed.
Pay attention to balancing – your snowman needs to be stable. When stacking the bowls, the largest should anchor the bottom with the medium and small bowls on top, creating the classic snowman silhouette.
Lastly, adorn your glittery creation with festive accessories like a scarf, hat, or buttons, using materials that complement his glistening body.
Remember, patience is key – allow your masterpiece to set completely before displaying it for all to admire as a beacon of homemade holiday spirit.
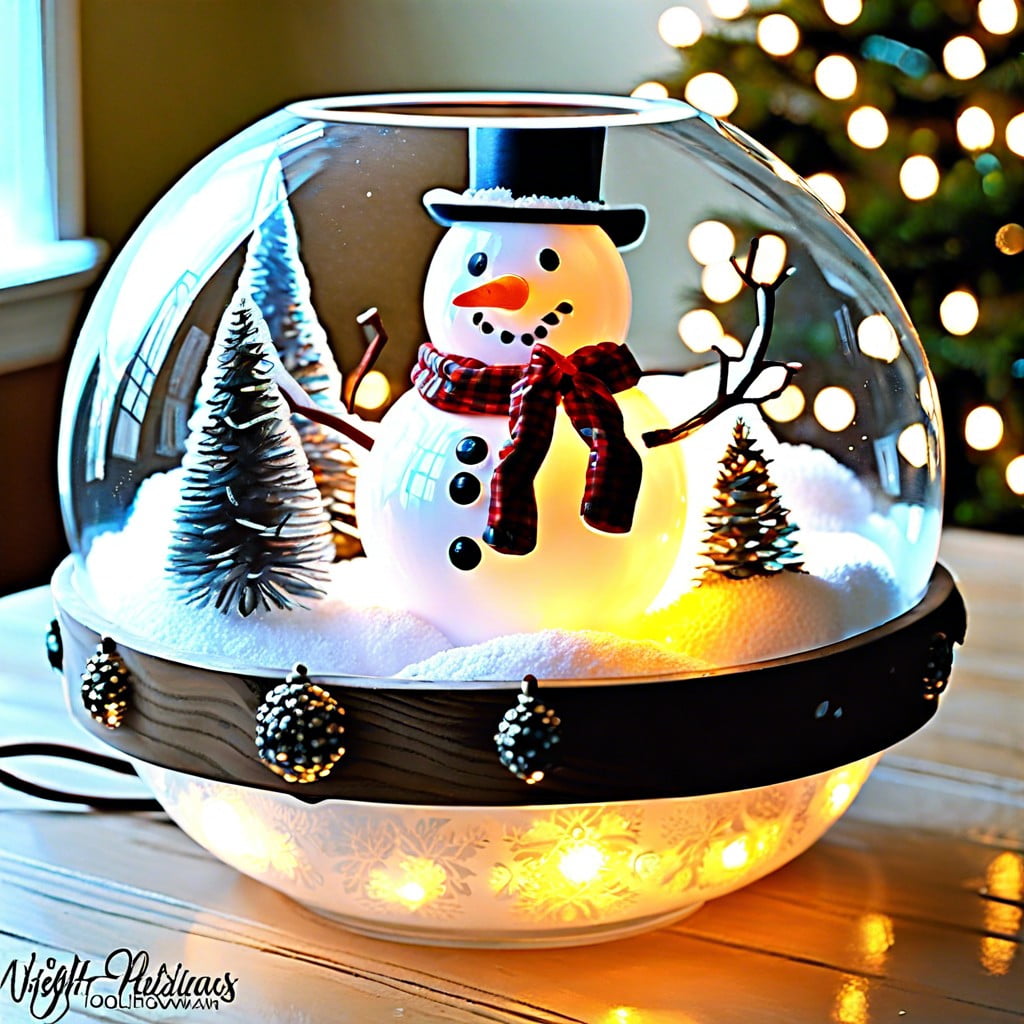
Make Your Homemade Fish Bowl Snowman Light Up!
To infuse your glass bowl snowman with a warm, enchanting glow, consider the following points:
- Choose the Right Lights: Opt for a string of LED fairy lights for their low heat emission and energy efficiency. Battery-operated ones grant more placement flexibility.
- Ensure Safety: LEDs are safer than traditional bulbs, but always check for defects before use.
- Layer Wisely: Start with a base layer of artificial snow, followed by lights coiled gently within the fishbowl. This creates an evenly lit snowman without visible wires.
- Light Distribution: Spread lights evenly to avoid overly bright or dim areas, ensuring a soft, magical illumination.
- Access: Situate the battery pack near the opening of the bowl, making it easy to switch lights on or off without dismantling your snowman.
- Final Check: Before sealing your snowman, turn the lights on to check for desired effect. Adjust as necessary for the ideal sparkle.
Following these tips, you’ll have a beautifully lit homemade snowman that captures the whimsical essence of winter and the festive season.
Materials
For this festive DIY project, you’ll need three different-sized glass bowls to create the snowman’s body segments. Select transparent bowls for a charming visual effect once lit.
A package of faux snow will provide a wintry touch, while battery-operated fairy lights will bring your snowman to life with a warm glow.
Use felt, colorful buttons, and ribbons to fashion a cozy scarf, eyes, mouth, and a cheerful nose.
Finally, grab a small piece of black construction paper to craft a top hat, adding a dapper finish to your delightful snowman display.
Tools
To ensure your crafting session goes smoothly, gather these essential tools:
- Hot glue gun: For strong, quick-drying bonding between glass surfaces and decorative elements.
- Paintbrushes: Necessary for applying glue for glitter or painting on delicate snowman features.
- Scissors: For trimming any fabric or accessories to size.
- Tweezers: Ideal for precisely placing small decorations or positioning light strings.
Remember, handling these tools requires care to avoid burns from the hot glue or slipping when cutting. Get ready to turn those simple bowls into a charming winter display with precision and ease!
Instructions
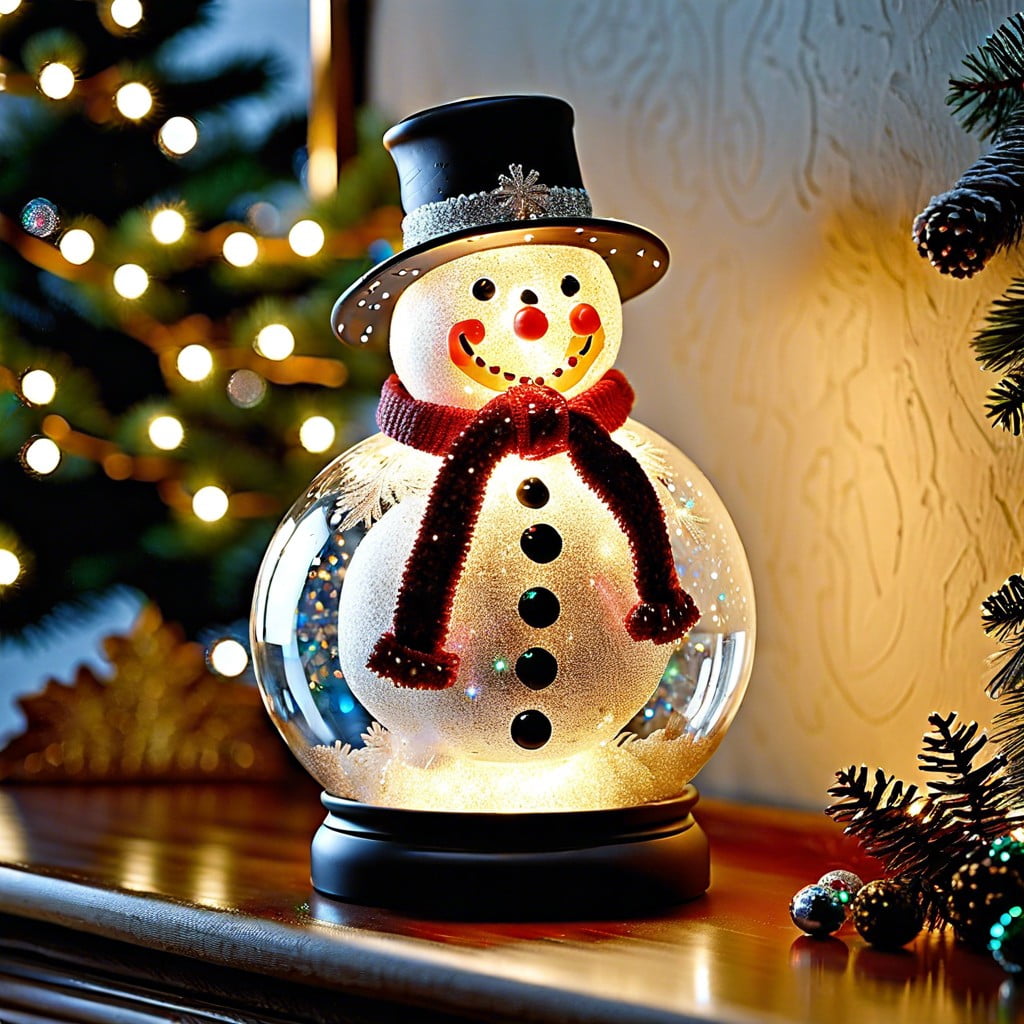
Begin by selecting three glass bowls of descending sizes to serve as the body of your snowman. Ensure they are clear to maximize the light effect. Layer the bowls with faux snow or glitter to mimic frosty sparkle.
Next, securely stack the bowls using a strong adhesive, starting with the largest at the base and the smallest for the head. Allow adequate drying time for stable construction.
For facial features and buttons, use waterproof markers or adhere embellishments such as beads or buttons. For the nose, a small piece of orange felt or a cone-shaped bead works perfectly.
Wrap a scarf around the neck area—a fabric strip or ribbon adds a touch of color. For a hat, consider a small terra cotta pot or a crafted cardstock top hat. Fasten securely with adhesive.
To illuminate the snowman, place a string of LED lights inside, arranging them to distribute light evenly. Battery-operated lights offer ease of placement and reduce cord clutter.
Finally, display your masterpiece in a visible location to enjoy the ambient glow of your charming glass bowl snowman.
Notes
When crafting your snowman, choose glass bowls of varying sizes to create a more dynamic and visually appealing figure. Ensure your adhesive is strong enough to bond glass securely to prevent any accidents. Consider using a funnel when adding faux snow to minimize mess.
If you’re including lights within your snowman, opt for battery-powered LED strings to avoid the hassle of cords and for safer handling. Always handle glass with care, and if crafting with children, supervise closely.
For a personal touch, feel free to decorate your snowman with items that reflect your unique style—think colorful scarves, patterned buttons, or even a hand-knit hat. Remember, this is a versatile project – switch up the decorations to suit different holidays or seasons.
Recommended Products
For crafting a stunning glass bowl snowman that twinkles and delights, consider these hand-picked products:
- High-Quality Glass Bowls: Opt for clear and smooth glass bowls in varying sizes to stack for your snowman’s body.
- Battery-Operated Fairy Lights: These provide a magical glow without the hassle of cords, ensuring your snowman can be displayed anywhere.
- Permanent Markers: Select a set with fine tips for detailed face and buttons drawing on glass.
- Adhesive: A strong, clear glue designed for glass will ensure your snowman’s layers stay securely attached.
- Decorative Ribbons and Fabrics: Choose festive patterns and colors for scarves and hats to give your snowman personality.
- Artificial Miniature Trees: Add a wintry touch by placing these around your snowman setup.
- Epoxy or Mod Podge: For a sparkling finish, use these to attach glitter externally for an enduring snow-kissed effect.
Remember, quality materials elevate your craft, resulting in a charming centerpiece that captivates all season long.
Answers to Your Questions About Making the Light-Up Snowman
Crafting a light-up snowman from glass bowls can spark several questions. Here’s a quick dive into the common inquiries:
- Stability Concerns:
How does one ensure the snowman doesn’t topple over? The secret lies in the distribution of weight. Use a heavier bowl at the bottom and lighter ones as you stack upwards.
- Choosing the Correct Adhesive:
What’s the best adhesive to use? Opt for a strong glue like E6000, which offers a firm hold and is ideal for glass-on-glass application.
- Lighting Decisions:
What type of lights should be used? LED string lights are recommended. They emit less heat, reducing the risk of overheating the glass.
- Decoration Durability:
Will the decorations hold up against the heat from the lights? Use heat-resistant decorations or place them away from direct contact with the lights.
- Maintenance Tips:
How to keep the snowman looking pristine? Simply use a microfiber cloth for dusting, and handle the bowls with care when assembling or moving the snowman.
These points are aimed to clarify the process and instill confidence in your crafting journey.
Browse More
 Baking Soda and Vinegar Drain Cleaning: Simple Steps for a Clog-Free Life
 How Long Does It Take to Tile a Bathroom: Your Ultimate Time-Saving Guide
 Smelly Drain: Banish Odors with Easy Fixes
 How to Remove Bathroom Fan Without Losing Your Cool
 How to Remove Bathroom Vent Cover Without Losing Your Mind
Recap