Last updated on
Get ready to transform your bathroom from bland to breathtaking because pallets are the most underrated gem for ecosystem-friendly, stylish renovations.
As the creator of these 20 unique pallet bathroom designs, I hope you find inspiration and enjoy exploring them as much as I enjoyed crafting them.
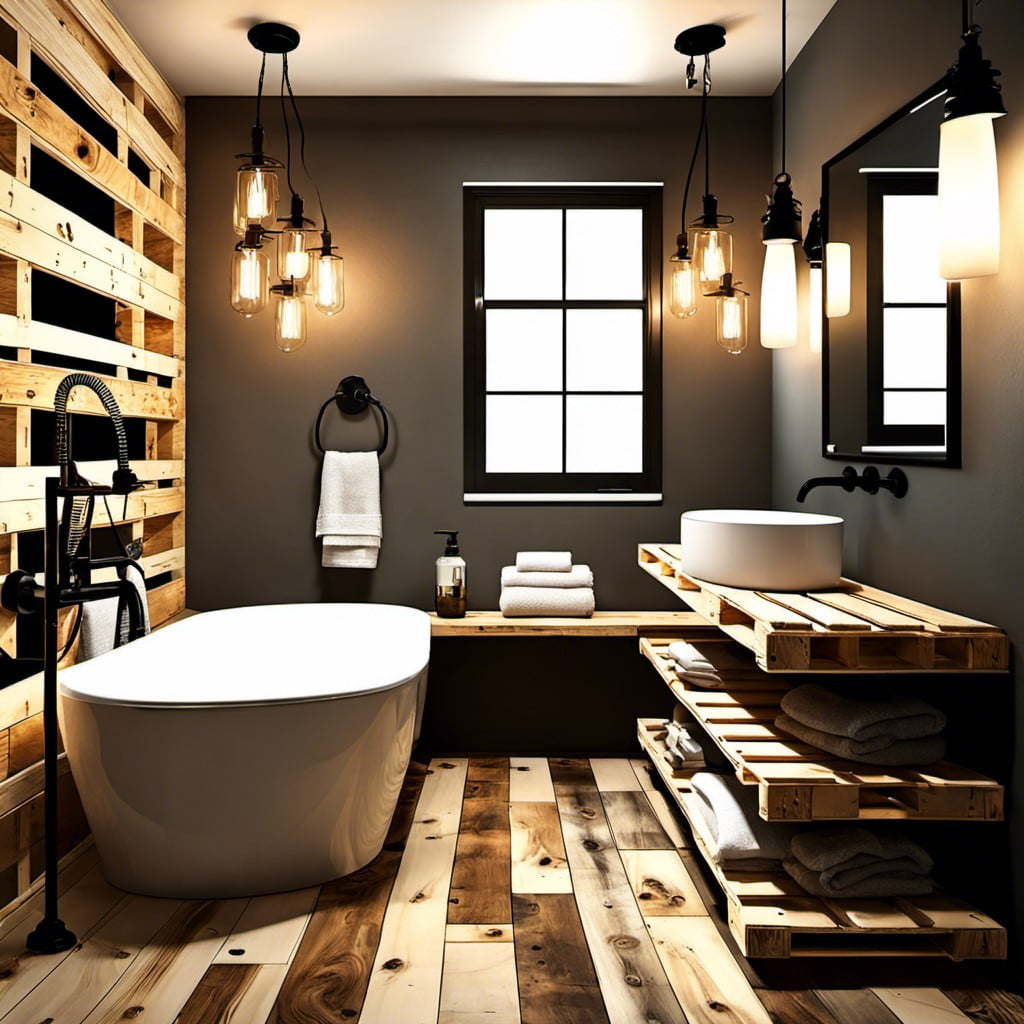
Pallets are a versatile material that can transform your bathroom into a rustic and stylish sanctuary. In this article, you’ll find a plethora of innovative ideas, from pallet vanities to towel racks, shower mats, and wall decor. Each idea comes with a detailed guide that will empower you to recreate these designs in your own home.
Whether you’re a seasoned DIY enthusiast or a beginner, these pallet bathroom ideas are sure to inspire and guide you through your next home improvement project. So, let’s dive into the world of pallet transformations and discover how this humble material can make a big impact in your bathroom.
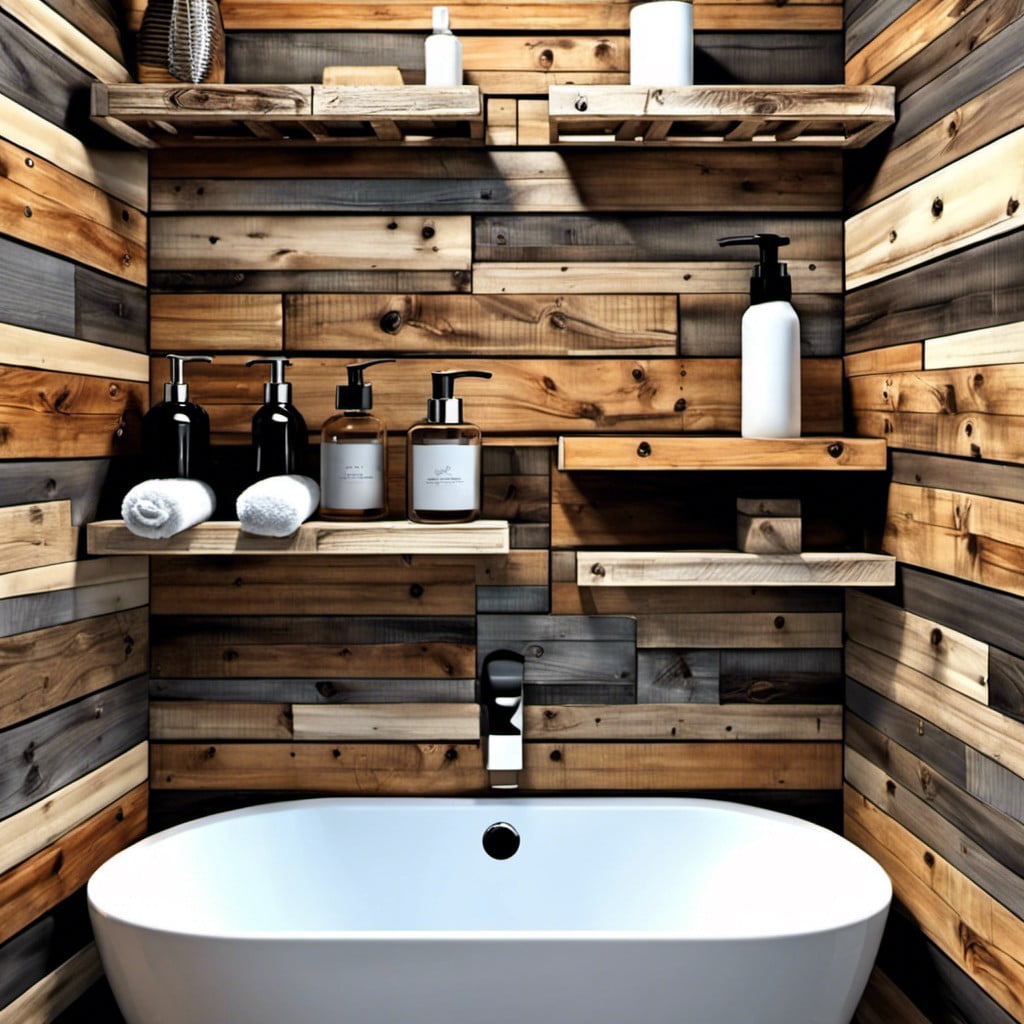
Pallet Bathroom Wall Panels
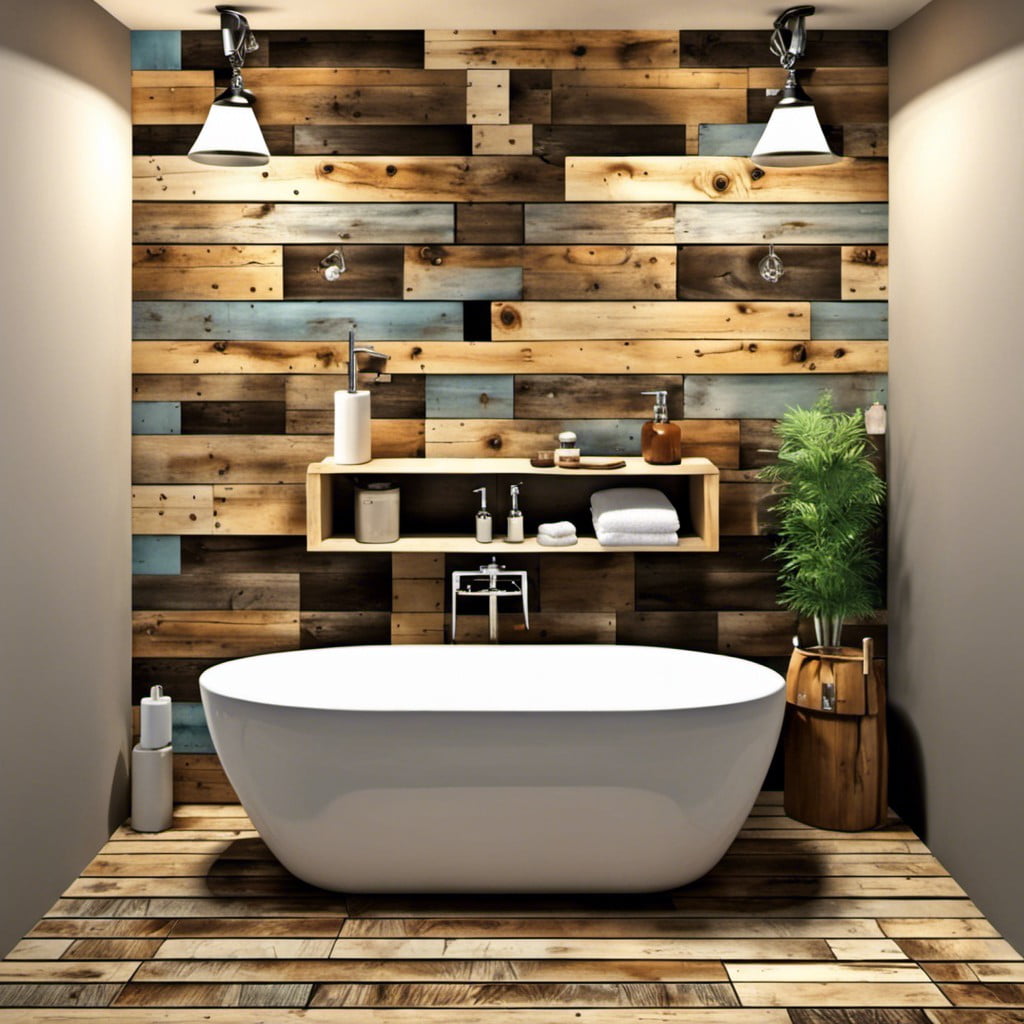
Pallet wall panels can invoke a rustic, cozy aesthetic in the bathroom. To start, ensure the pallets are safe for use, well cleaned, sanded and protected against moisture.
Then, choose a pattern for arranging them. Horizontal patterns often provide a spacious feel, while vertical patterns evoke a sense of height.
Consider finishing the pallet panels with paint, varnish, or leave them natural for a more authentic rustic look. You can add extra flair with stencils or decals of your liking.
Always ensure to seal the completed project with a waterproof coating to enhance durability.
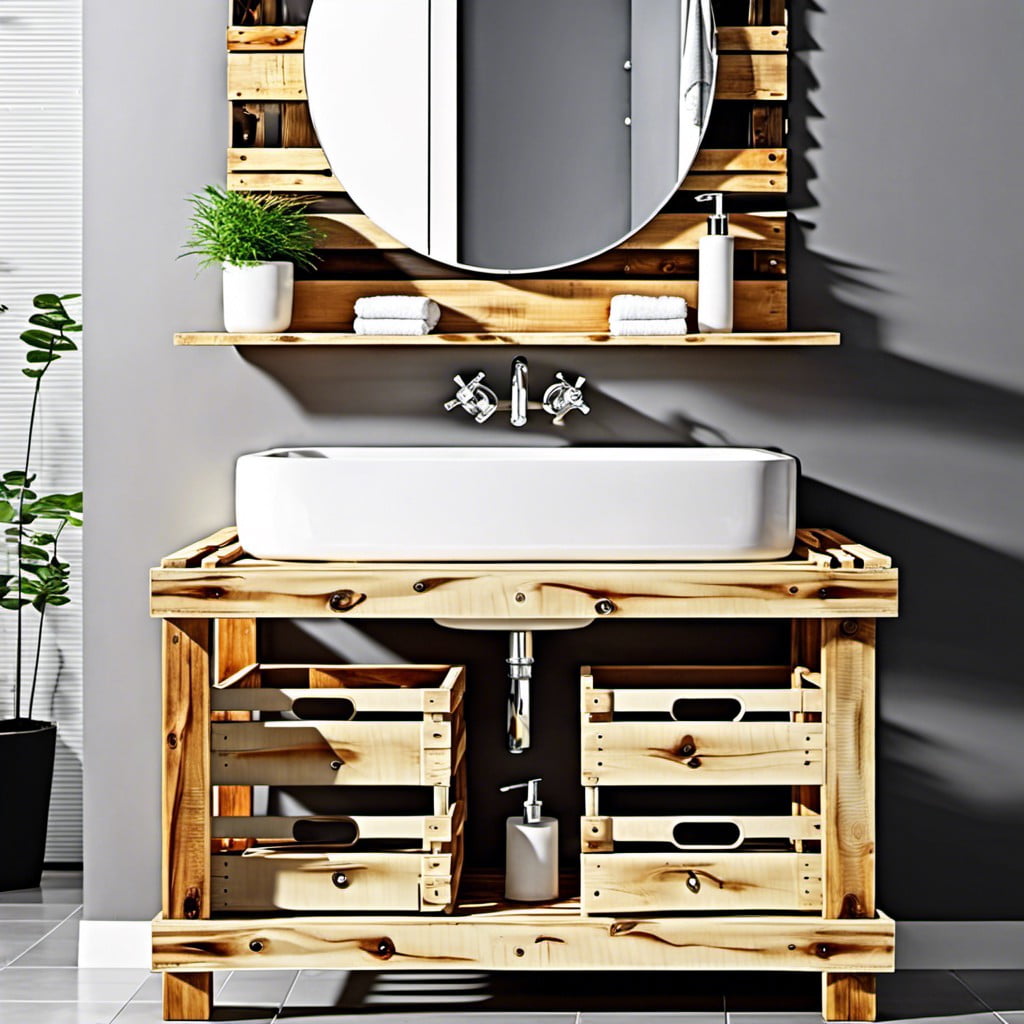
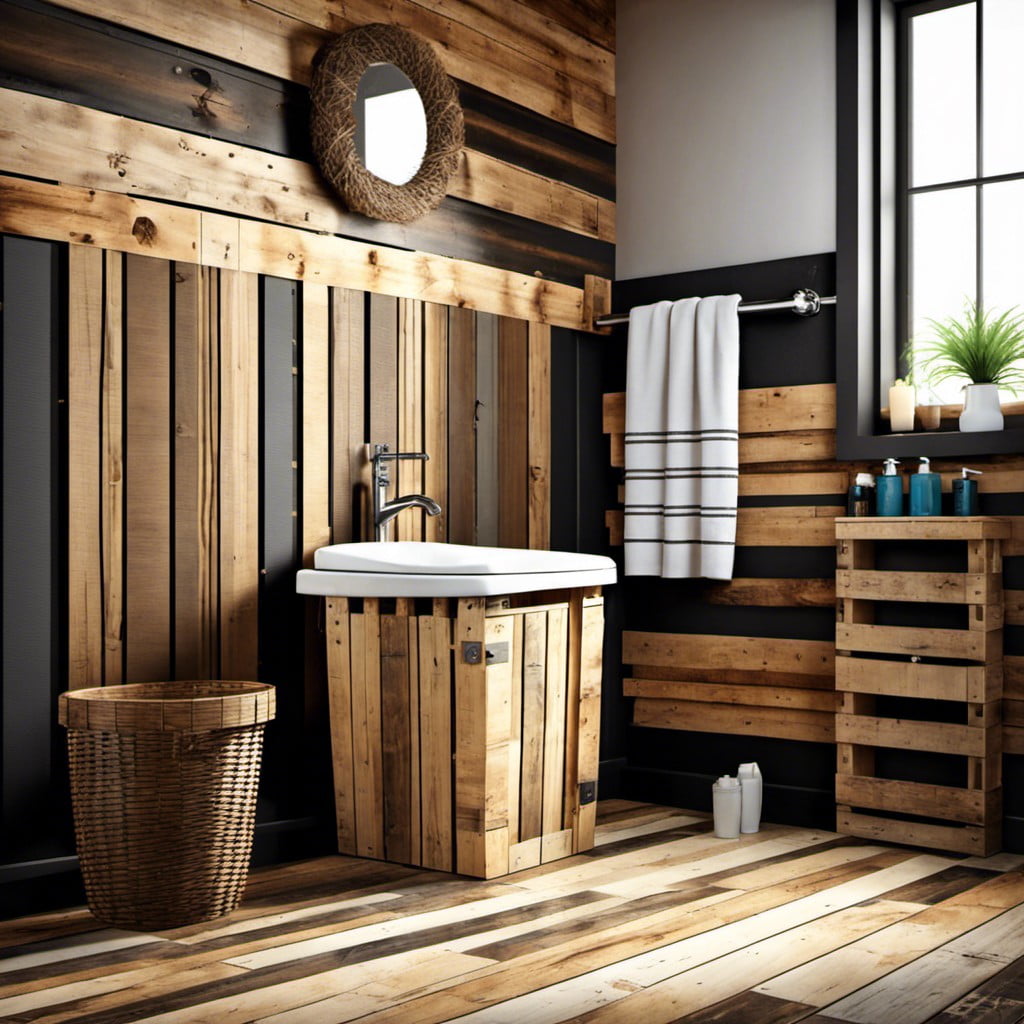
Pallet Vanity With Sink
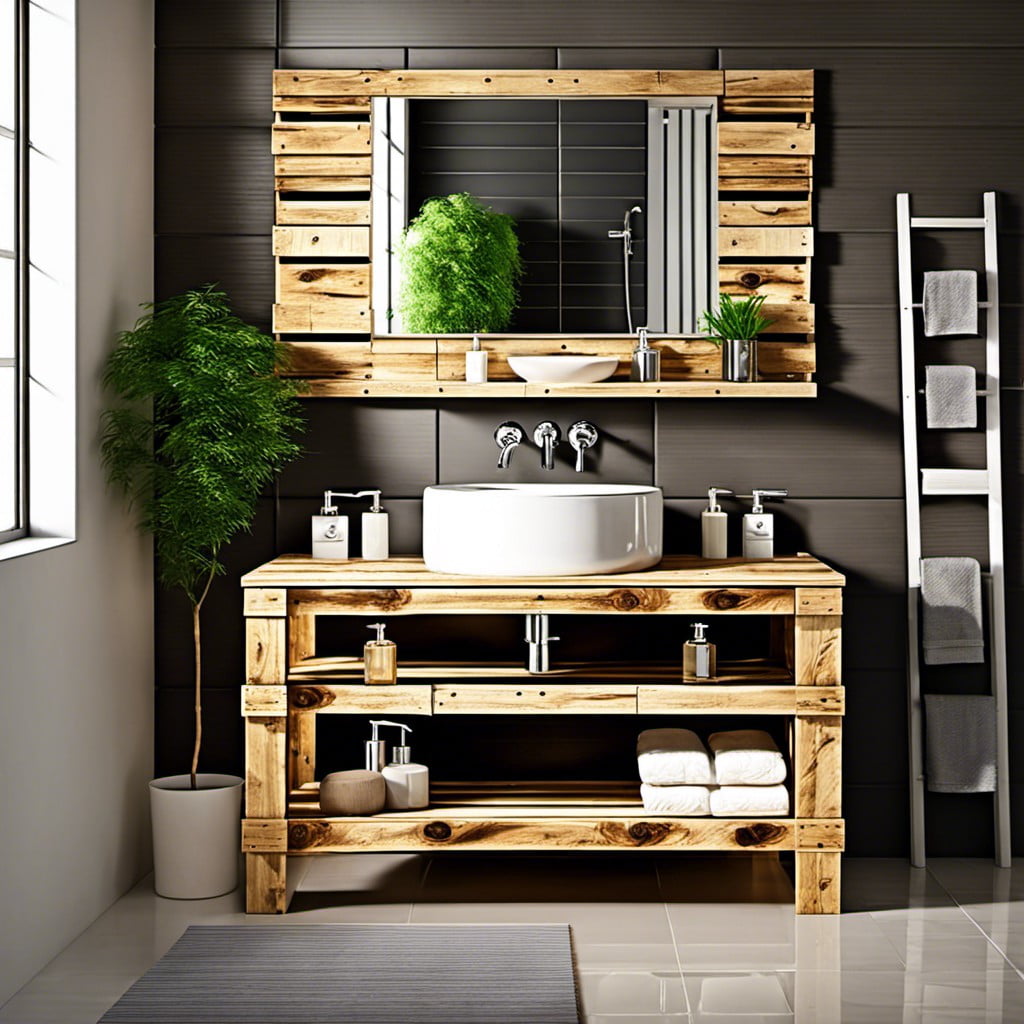
Crafting a vanity from upcycled pallet wood contributes to a minimalist, rustic aesthetic that enriches the ambience of the bathroom. It’s not only cost-effective but also an eco-friendly approach to interior decor.
1. Measuring the area: Determine the dimensions based on the available space and the sink size. The proper balance is essential to avoid overwhelming the bathroom.
2. Preparing the pallet: Dismantle, sand, and stain the pallet wood to optimize its appearance and durability. Always consider waterproofing to protect the wood from moisture.
3. Building the vanity: Engage in a fun DIY project or consult a professional for complex designs. A sturdy structure is paramount for safety and durability.
4. Installing the sink: A recessed sink allows it to fit well with the wooden texture, giving it a refined look. Plumbing should be done carefully to avoid leakage.
5. Adding storage solutions: Customizable shelves or drawers can enhance the functionality of the vanity.
6. Finishing touches: Consider adding hardware such as a stylish faucet or handle to create a unique blend of rustic and modern. Matching fixtures can create aesthetic harmony.
This refreshing take on bathroom vanities not only serves practical purposes but also infuses personality and charm into your space. Remember, the idea is to get creative, mix, and match elements to create a vanity that resonates with your taste.
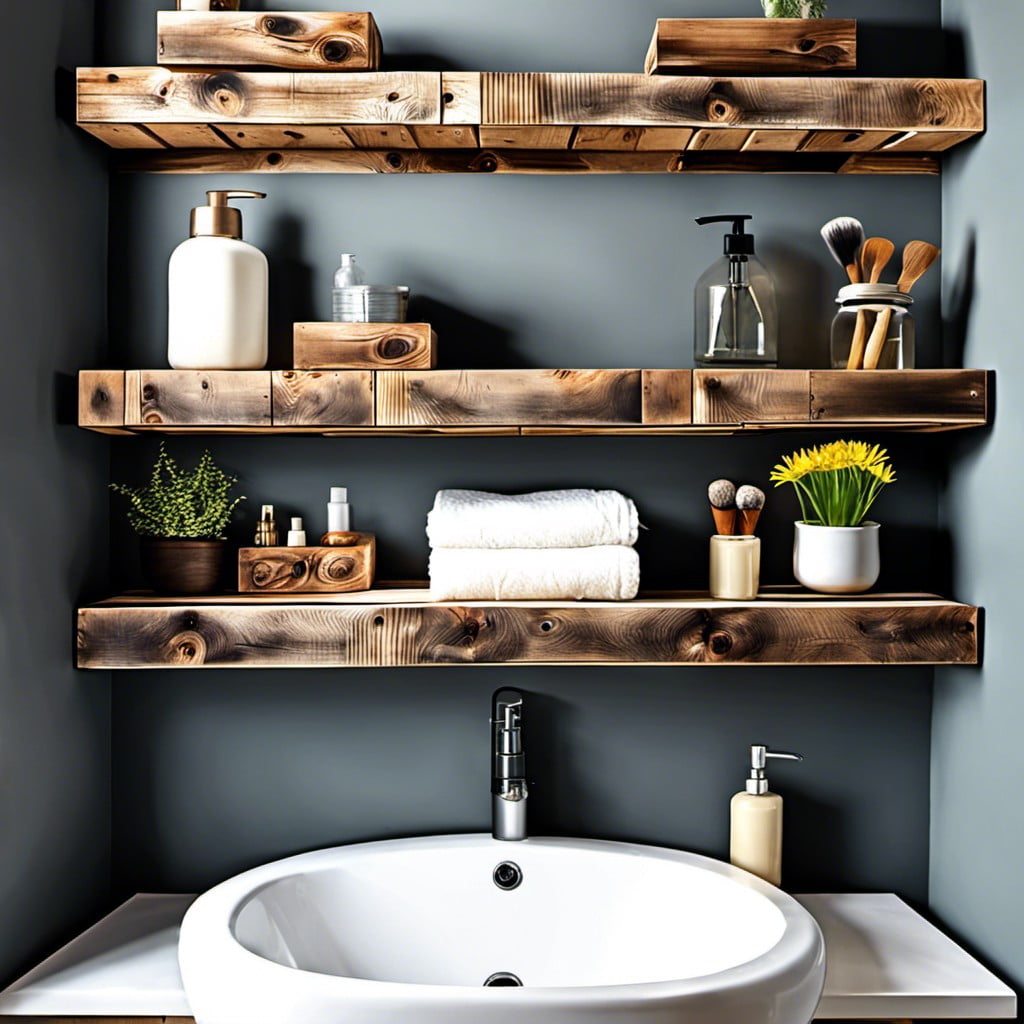
Pallet Storage Shelves
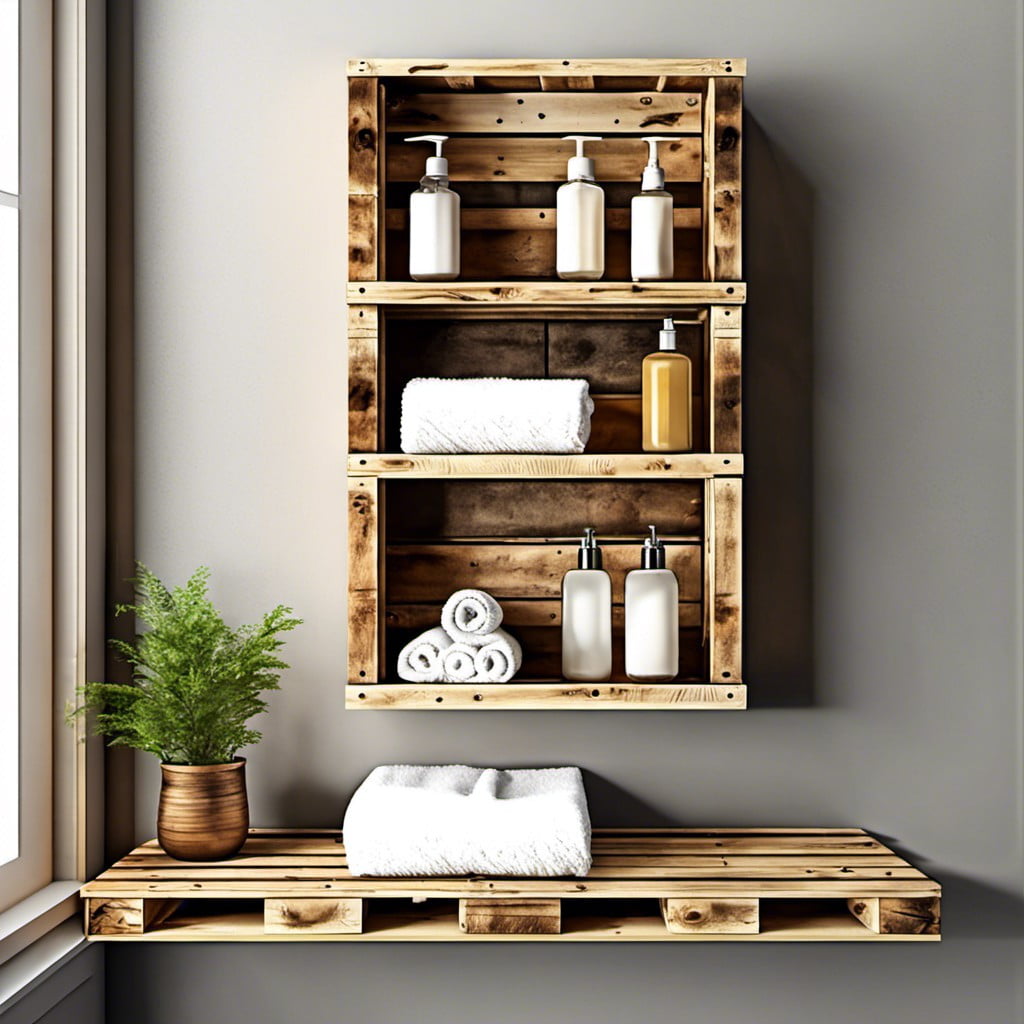
Crafted from repurposed wooden pallets, these unique shelves not only offer much-needed storage space in your bathroom but they also enhance the visual appeal. First off, ensure your pallet’s durability and sturdiness, as it needs to hold bathroom essentials without faltering.
Here’s a simple step-by-step guide to make pallet shelves:
- Start by carefully dissembling the pallet structure, maintaining the integrity of each plank.
- Sand down each piece to remove any possible splinters or rough edges and apply a wood finish for a glossy look.
- Decide on the design – single, multiple tiers, or floating shelves, and cut the planks accordingly.
- Use strong anchors, screws, or brackets to assemble and secure the shelves to the wall.
Remember, the key to success is to be creative and versatile. You can make a single narrow shelf for your scented candles or a larger one for towels and toiletries. You can even paint or stencil it to match your bathroom theme. Never underestimate the potential of pallets!
Pallet Bathtub Cover

Creating a bathtub cover from upcycled pallets adds a unique touch and rustic appeal to your bathroom. Start by measuring your tub, ensuring the cover fits beautifully. Be sure to leave a handy cut-out or open space for easy access to the bathtub faucet.
Select pallet wood with minimal imperfections for this project. Begin assembly by aligning planks to form the cover’s top surface. Secure the planks firmly together with braces on the underside.
Remember to sand each plank properly to achieve a smooth, splinter-free finish. You can either preserve the natural tone of the wood with a clear sealant or opt to paint it according to your bathroom’s color scheme.
If desired, add some functionality by incorporating candle holders or a book stand into your design, turning bath time into a divine and relaxing experience. These small touches give your pallet bathtub cover a bespoke, luxury feel, proving that chic bathroom updates can indeed be achieved on a budget. Remember, this project is both about aesthetics and practicality, enhancing the overall look while providing extra functionality.
Pallet Framed Mirror
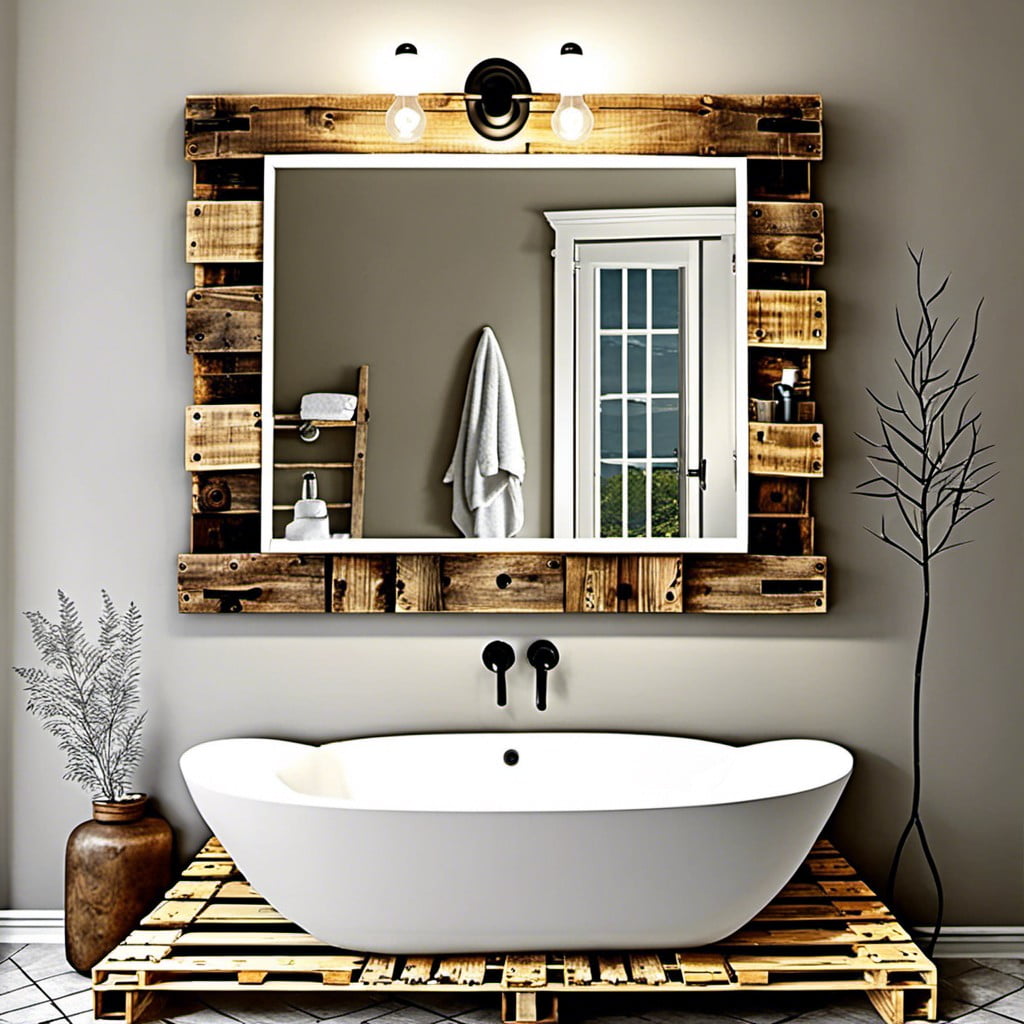
Creating a frame with pallet wood can add character to an otherwise plain mirror. To begin, measure the dimensions of your mirror, taking into account extra space for the frame. Choose pallet boards that are in good condition and aren’t warped. Sand these boards to ensure they are smooth and to bring out the wood’s natural grain.
Next, cut the boards to fit the measurements of your mirror. For a rustic feel, leave the boards longer to create an overlapping corner detail. Assemble the frame using wood glue and nails for added durability. Protect the finished frame with a clear coat of varnish, or for added flair, consider staining or painting.
Finally, secure the mirror to the frame. Be sure to use mirror adhesive, as standard adhesives can damage the mirror’s backing. There you have it, a pallet framed mirror that not only serves a functional purpose but also adds a stylish touch to your bathroom décor.
Pallet Toilet Paper Holder
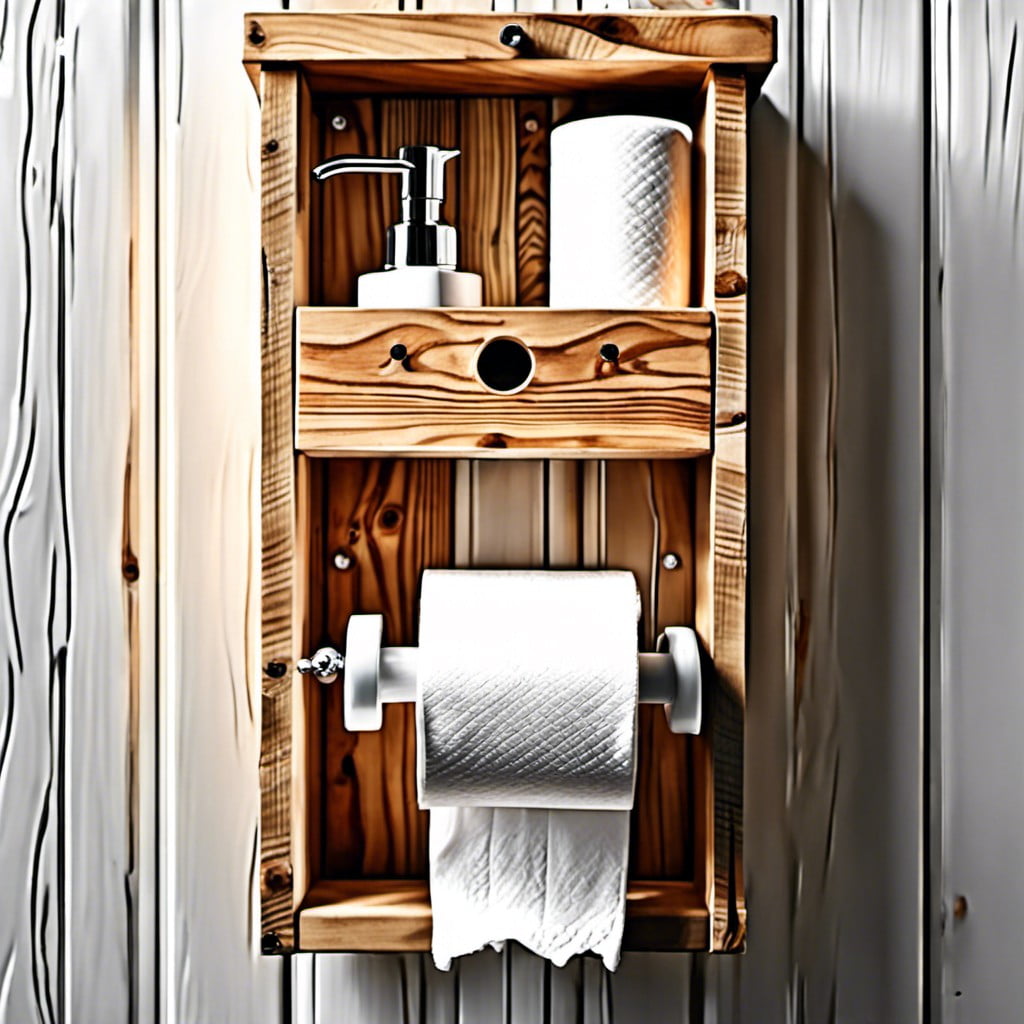
For a rustic yet practical touch, consider the addition of a unique pallet toilet paper holder. Here’s a breakdown of the concept:
1. Versatility: With a variety of finishes available, you can tailor the holder to match your bathroom decor.
2. Easy Assembly: The required materials for this project are merely a small pallet plank, a dowel, and some screws.
3. Space-saving: Being a wall-mounted fixture, it doesn’t occupy any floor space, making it perfect for smaller bathrooms.
4. Design Addition: Beyond the functional aspect, the holder can act as an attractive rustic element to your bathroom aesthetic.
5. Bonus Storage: Depending on the design, some holders offer extra space for keeping additional rolls or other small items.
6. Durability: Given the sturdy nature of pallet wood, this holder ensures long-lasting usage.
7. Personalization: You have the freedom to personalize it, perhaps by adding a small plant or by stenciling your favorite quote.
In essence, this small DIY project adds functionality with a dash of personality to your bathroom.
Pallet Towel Rack

This quick and easy project is perfect for those who need more storage for their towels. Moreover, it’s an effective way to keep your space clutter-free.
1. Begin with a sturdy pallet. Remove any nails and sand the wood to a smooth finish.
2. Options for staining or painting the finished rack can either complement the existing bathroom décor or provide an accent color.
3. Aim for a size that matches the number of towels you typically use. A standard size might accommodate two or three towels, but this can be adjusted based on personal need.
4. Spacing out the slats accordingly will allow the towels to hang freely, promoting easier drying.
5. For a finished look, add hooks on the bottom of the rack for hand towels or bathrobes.
6. Finally, secure the completed towel rack to your bathroom wall with reliable, heavy-duty hardware.
Remember to keep safety foremost as you craft your custom pallet towel rack. With this one simple addition, your bathroom can have even more of a personalized touch!
Pallet Bathroom Signs
These creative signs are not only functional but also contribute a homely, rustic charm to your bathroom. Created from small or large pallet planks, customizable messages can be painted or burned into the wood.
Whether directing visitors to the washroom, reminding kids to wash their hands, or adorning the space with comical or inspirational messages, these signs are a perfect form of personal expression. By choosing the shade that complements your overall color scheme, you enhance the harmony of the space.
To ensure longer lifespan, a protective coat or sealant is recommended. Hanging mechanisms can vary according to your style – rustic ropes or modern hooks, both add distinct character. A little creativity can go a long way, transforming a simple pallet plank into a charming bathroom asset.
Pallet Ladder Shelf
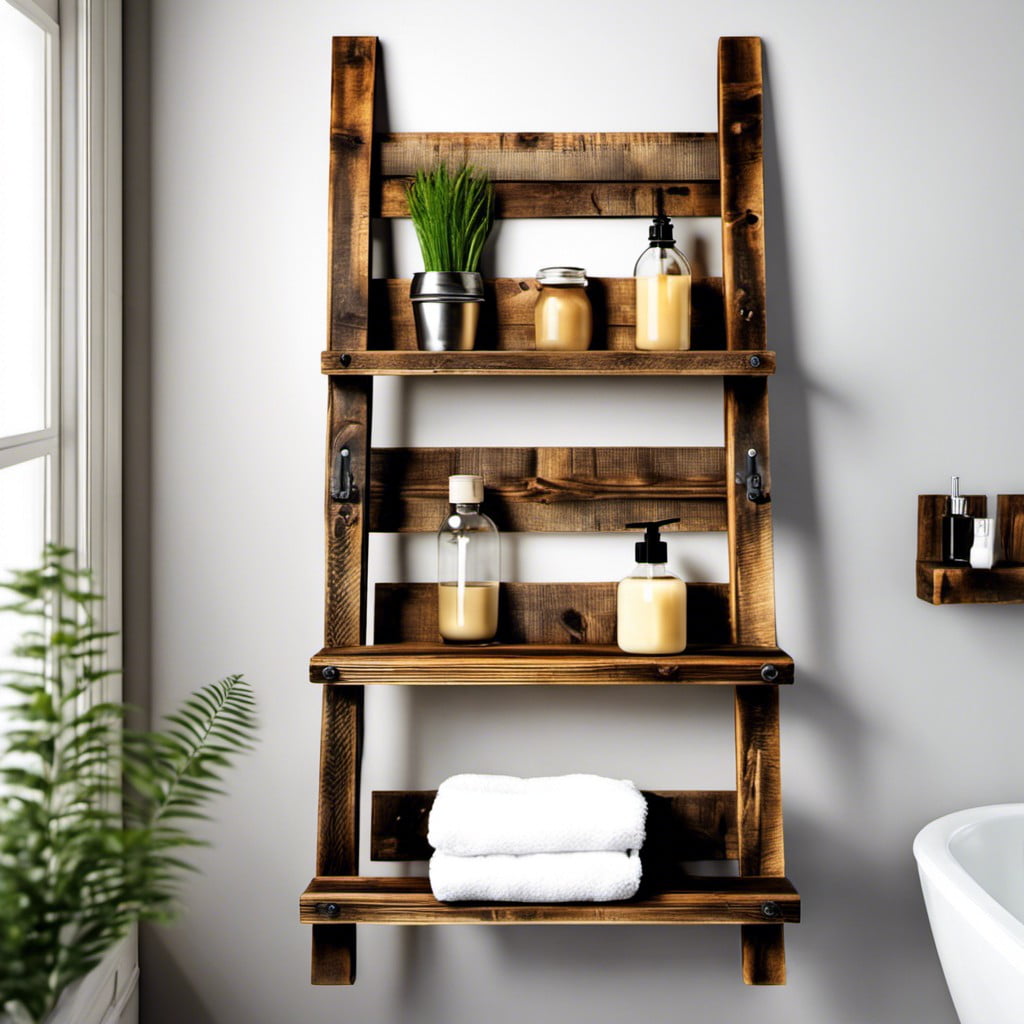
This shelf not only provides practical storage space but also adds a rustic charm to any bathroom. It’s amazingly simple to produce. You’ll need two or three sturdy pallets, a saw, some nails, and a bit of elbow grease.
Start by cutting your pallets to the desired length. Secure each rung about 12 inches apart – this can be adjusted based on your storage needs. Fasten each pallet piece securely, ensuring it’s stable before mounting it to your wall.
Remember to treat or paint your shelf adequately to resist damp conditions and match your bathroom style. It’s the perfect place for towels, toiletries, or decorative items, offering style and functionality all at once. Versatility is its strong point – you can choose to place jars, wicker baskets, or folded linens on each rung.
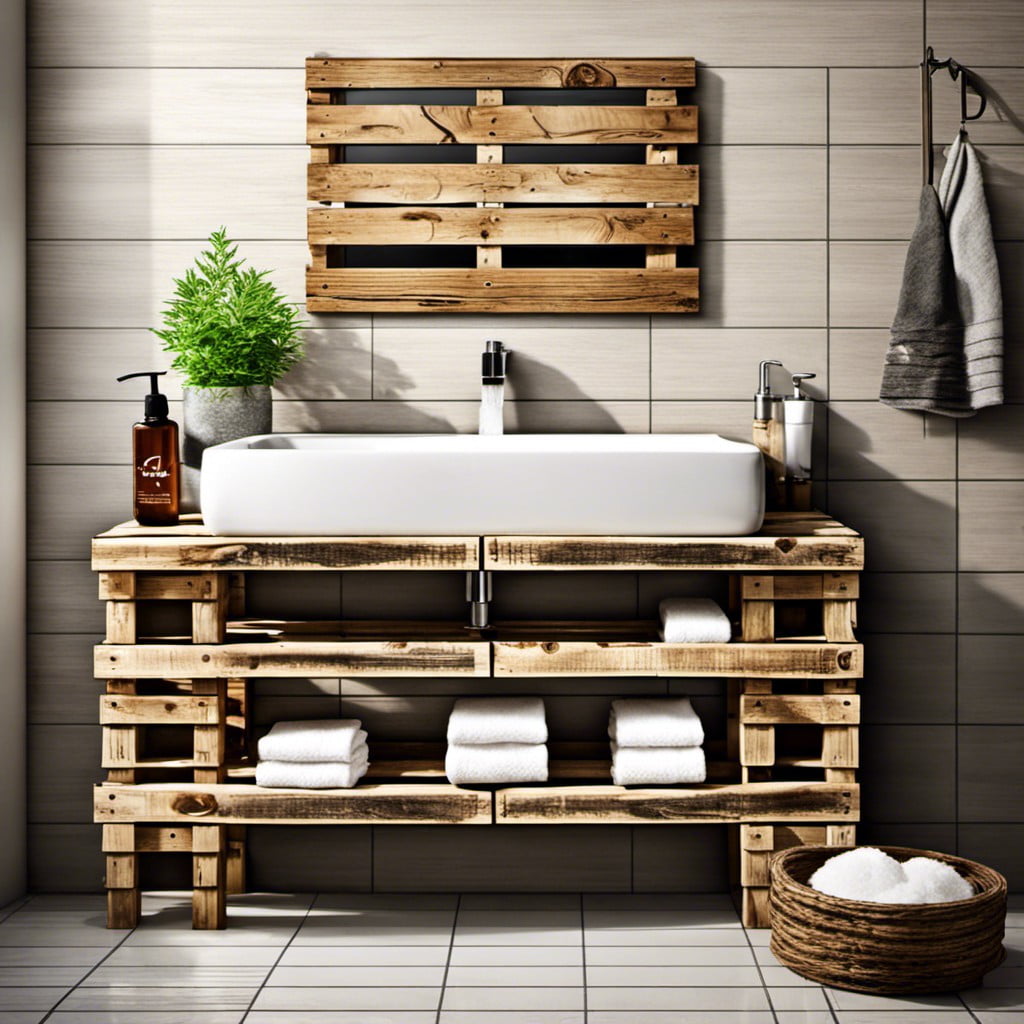
Pallet Sink Stand
A pallet sink stand offers a rugged, rustic look, and it is surprisingly easy to construct. Sturdiness and water-resistance are prime here, so always use a heat-treated, not chemically treated, pallet. After assembly, apply a generous layer of waterproof sealant to protect against moisture and spillages.
For design, consider options for closed or open storage. Closed storage, using a door or two, will hide away toiletries, while open shelves provide easy access and a more casual aesthetic.
In terms of surface, you could use remaining pallet wood for a unified look or experiment with poured concrete or upcycled old table-top.
Remember to take exact measurements of the sink and plumbing fixtures. Lastly, ensure the design allows easy access for plumbing installation and maintenance.
Pallet Floating Shelves
Creating these versatile pieces can make use of otherwise wasted space. Hinge them on the walls to store towels, cosmetics, or decorative elements. Due to their hanging nature, they optimize space by allowing storage on, beneath, and sometimes above the shelf.
1. Select a sturdy pallet. Ensure it can bear the weight of items to be stored.
2. Cut to the desired size. Larger shelves can accommodate towels, while smaller ones can house accessories.
3. Sand the wood. This step is crucial to creating a smooth surface. Use a fine-grain sandpaper for best results.
4. Apply a finish. Whether left in its raw state, stained, or painted, be sure the finish complements the bathroom’s design scheme.
5. Install brackets. The type of wall determines the best installation method. Drywall requires expanding anchors, while masonry walls need plastic plugs.
6. Attach the pallet to the brackets. Use the manufacturer’s instructions for this step, ensuring the shelf is leveled and secured properly.
Remember, safety is essential. Always use the correct tools and take necessary precautions when handling them. The result – a unique shelf adding character to your bathroom.
Pallet Planter for Bathroom Greens
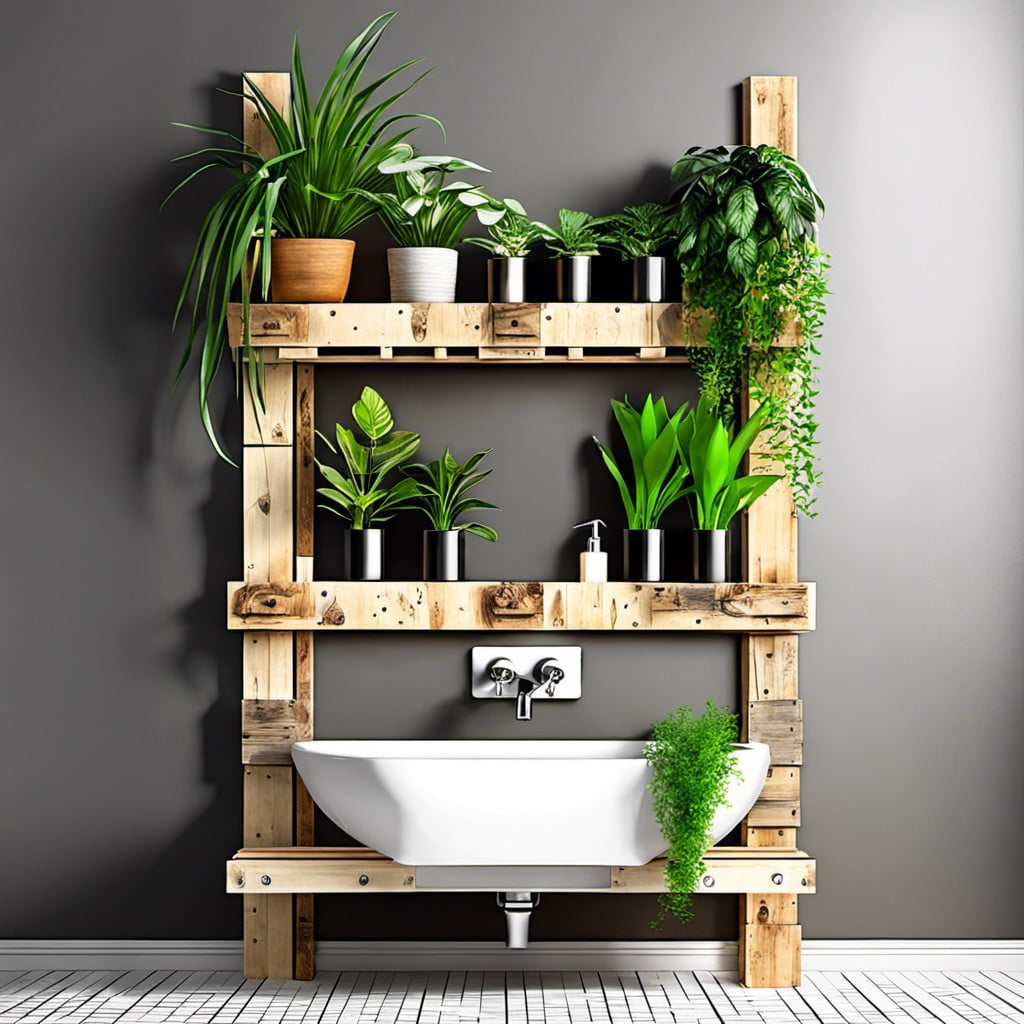
Incorporating a dose of nature to your bathroom can rejuvenate the atmosphere and enhance the calming aura. Here’s how you can do this with the pallet planter for your bathroom greens.
1. Choose the type of plant that thrives well in bathroom conditions – consider moisture-loving or low light plants. A few options include ferns, spider plants, or the peace lily.
2. Construct the planter: As per the size of your plant pot, decide the dimensions of the planter box. Assemble pallet pieces and secure them with nails or screws to form the box.
3. Treat the Pallet: To ensure longevity, especially in a moist environment like the bathroom, treat the pallet planter with a coat of water-resistant paint or varnish. Remember to follow safety precautions when handling chemicals.
4. Install it: Based on your bathroom layout, you can hook it on the wall, place it on a countertop, or let it sit elegantly on the floor. Ensure the spot gets at least some indirect light for the plant to flourish.
5. Care for your plant: Follow the specific care instructions for your chosen plant to keep your green buddy happy and healthy, thus boosting the overall aesthetics of your bathroom.
Remember that having live plants inside your bathroom not only elevates the design but also contributes to purifying the air.
Pallet Shower Floor
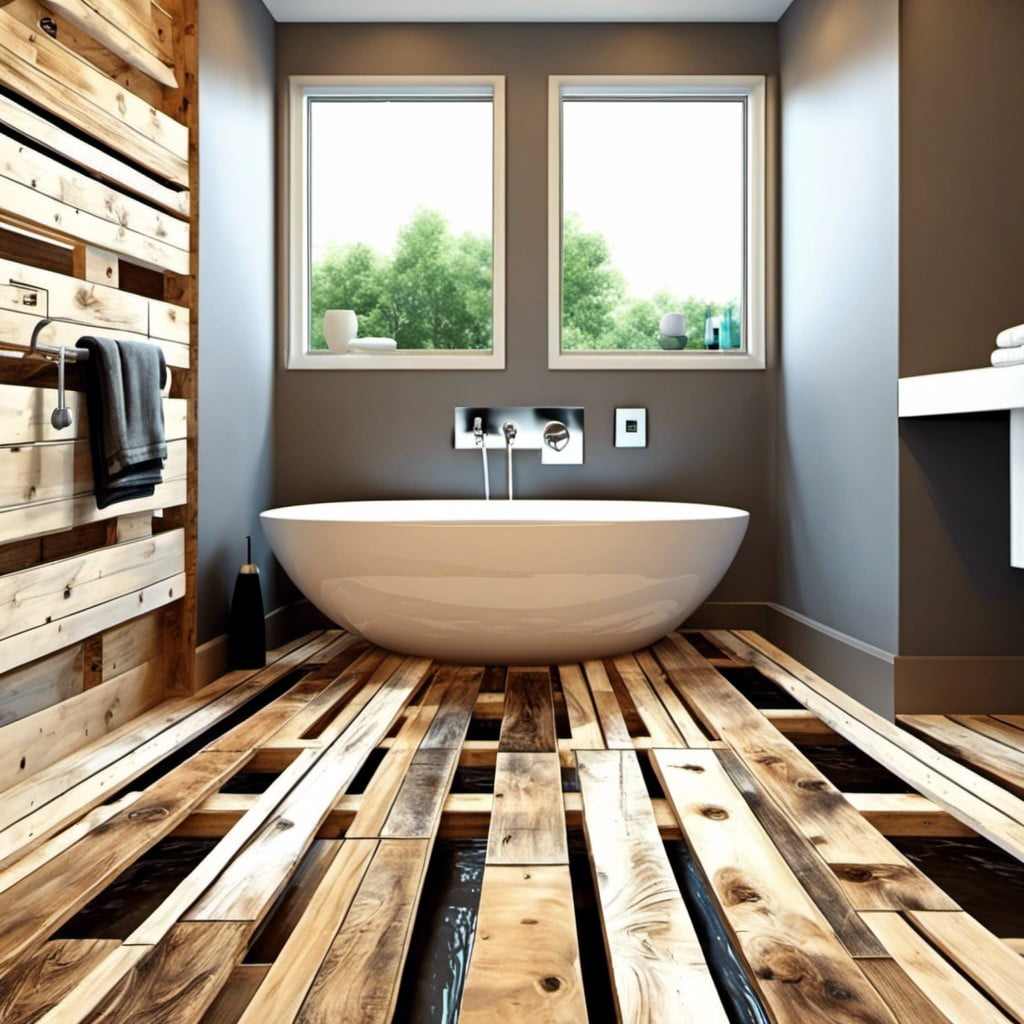
Transitioning from traditional tiles, introducing a pallet shower floor doesn’t merely bring a rustic aesthetic to your bathroom but also serves functionality with its naturally slip-resistant property.
Here’s how it works:
1. Use heat-treated pallets: Heat-treated pallets are safer and more sanitary choice for your bathroom. Avoid chemically treated ones to dodge health risks.
2. Seal for waterproofing: It’s vital to ensure your pallet shower floor is waterproof. Apply a high-quality sealant to prevent water penetration and prolong the life of your pallet floor.
3. Choose hardy wood: Not all pallet woods are created equal. Opt for hardwood pallets like oak or maple for durability and resistance to rot and pests.
4. Plan Drainage: Design your pallet shower floor with sufficient gaps to facilitate easy and efficient water drainage.
5. Regular Maintenance: Regular cleaning and maintenance, including retreatment of sealants, increase longevity and freshness of the pallet shower floor.
As with any DIY project, professional advice is encouraged to ensure safety compliance and optimum results.
Pallet Bath Caddy
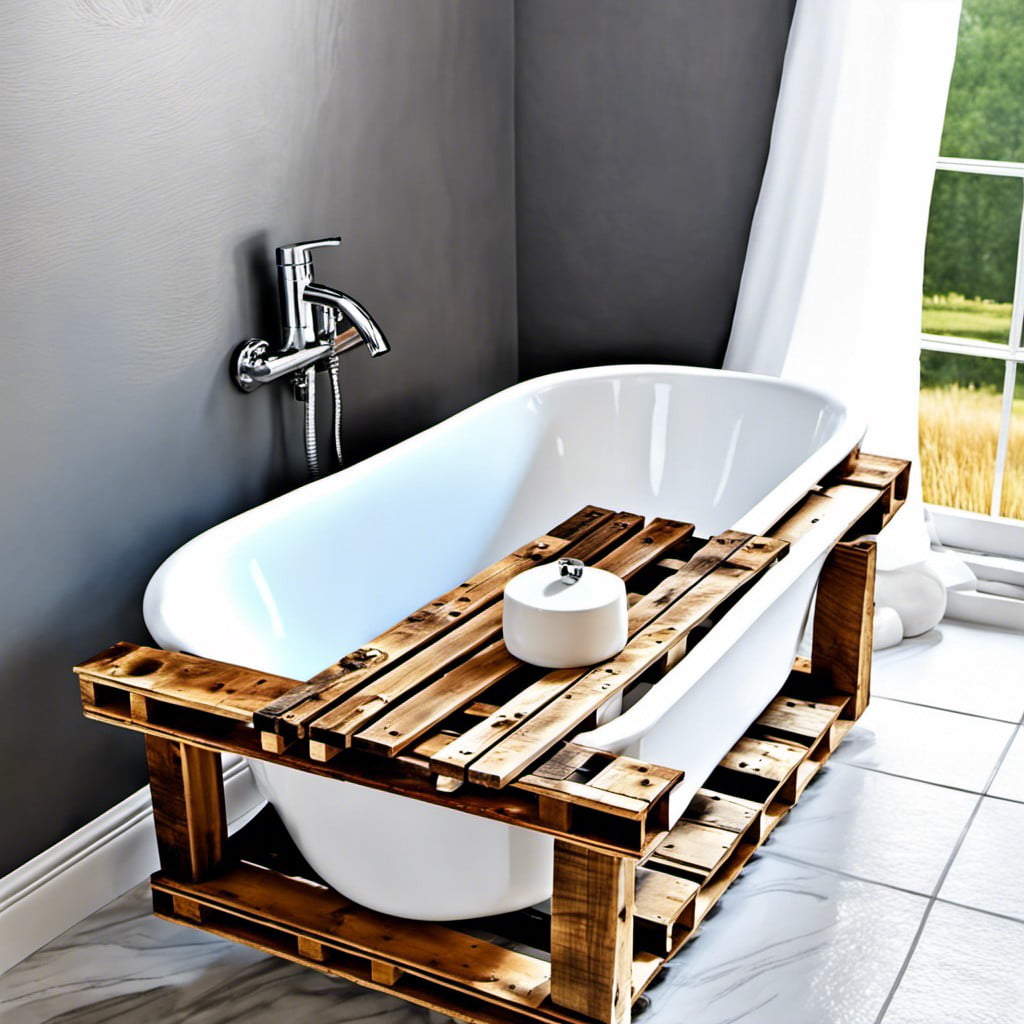
Crafting a bath caddy from a pallet can create a rustic and functional piece for your bathroom. To avoid water damage, ensure you treat the pallet wood with a suitable sealant, granting longevity to the item.
Secondly, customize the caddy to fit perfectly across the width of your bathtub. Be ingenious – sections can be added for soap, candle, a glass of wine, or a book holder.
For a touch of luxury, line the book holder with a waterproof fabric, giving your reading material protection from splash damage. Factor in varying width of the tub’s edges as they can differ dramatically, you don’t want it slipping into your relaxing soak!
Last but not least, sanding down any rough edges will contribute to a polished finish and prevent any unwelcome splinters.
Pallet Bathroom Stool
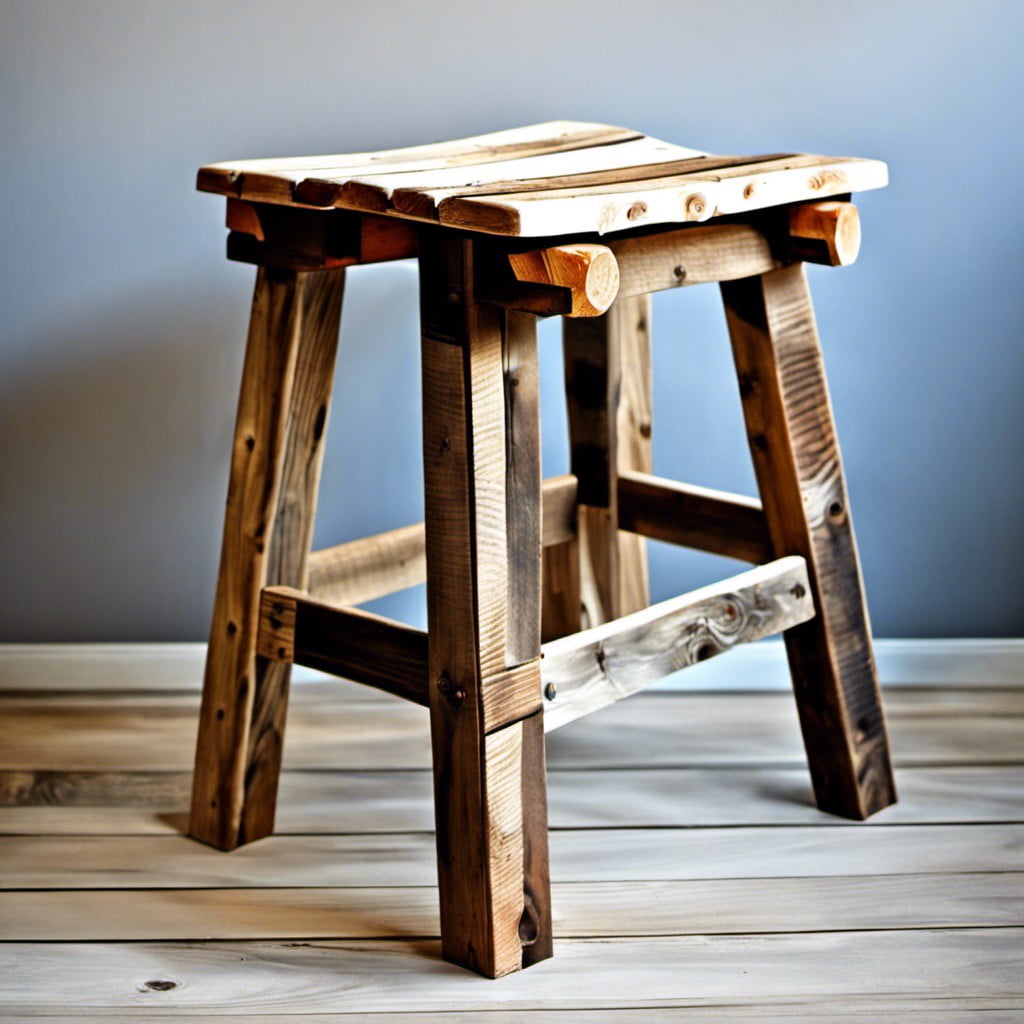
To build a pallet bathroom stool, you’ll need a clean pallet. Remember, safety is crucial when dealing with reclaimed wood; ensure it’s clean, free of pests, and nails.
Cut four vertical strips, ideally 18 inches in height, for your stool’s legs. Then, fashion the seat from wider pallet sections. Secure the seat to the legs with screws, ensuring stability.
The charming thing about this stool is that it’s perfect for both aesthetic appeal and functionality. It can serve as a resting spot during your morning routine or as a footrest during a relaxing soak in the tub. Moreover, a touch of paint and a sealant could help match this nifty addition to your existing bathroom décor. Consider adding a plush seat cushion for enhanced comfort.
Using pallets for building a stool is not only cost-effective but also an eco-friendly option. It reuses materials that would otherwise go to waste, reducing environmental impact while enhancing your bathroom’s unique style.
Pallet Lighting Fixture
To bring a rustic-chic element to your restroom, turn your attention upwards to your lighting fixtures. A pallet can be repurposed into a light pendant that’s both aesthetic and functional.
Firstly, disassemble a pallet into individual planks. Always remember to sand each piece thoroughly to prevent any splinters or rough patches. Following that, a rectangular or square frame should be assembled. Depending on your personal preference, you could varnish or paint the wood.
Next, drill holes depending on the number of bulb holders you wish to install, keeping in mind each hole should fit a bulb holder perfectly. Wire up your bulb holders. Thread the wires through the holes and secure them with your bulb sockets.
When mounting the fixture, it’s important to ensure the mounted ceiling hooks can withstand the weight, and the wiring adheres to safety standards. Also, choosing energy-efficient bulbs will keep it eco-friendly.
This unique, handmade fixture will effectively illuminate your space while adding warmth and a designer touch to your bathroom decor.
Pallet Trash Bin
Upcycling pallets into a bathroom trash bin results in a unique, rustic accent piece that’s both functional and decorative.
Start by disassembling a pallet, carefully removing the nails.
Once all pieces are collected, form the sides, then connect them together, ensuring a snug fit.
For the bottom, trace its size, cut the wood, and attach it to the newly formed box.
Depending on personal preferences, add a lid using hinges, or go open-top style for more convenience.
This bin can be left natural, stained or painted to match the bathroom decor.
For added detail, consider wrapping the exterior in rope.
Pallet Wall Racks
Imagine a rack, versatile and sturdy, perfect for all your bathroom accessories. Made out of repurposed pallets, it can impart both rustic charm and durable storage. The key is to choose the right pallet, preferably of good quality hardwood.
Remember, moisture is a factor in bathrooms, so prioritize sealing your rack before installing. This includes all edges, corners, and surfaces.
Depending on your bathroom size and wall space, you can tailor the size of your rack. Whether you need a petite solo shelf or a sizeable multi-tiered one, it’s entirely up to you.
Consider adding some hooks for hanging towels or robes. They can be easily screwed onto the bottom of the rack, making it multi-purpose while saving precious floor space.
Feel free to get creative! The pallet’s natural rugged aesthetics can be complemented by painting it in shades that match your bathroom palette, or staining it to showcase the beautiful grain of the wood.
Use your wall rack to display candles, keep your toiletries, or house potted plants. With functionality and style combined, it’s a true reflection of clever crafting!
Pallet Soap Dish
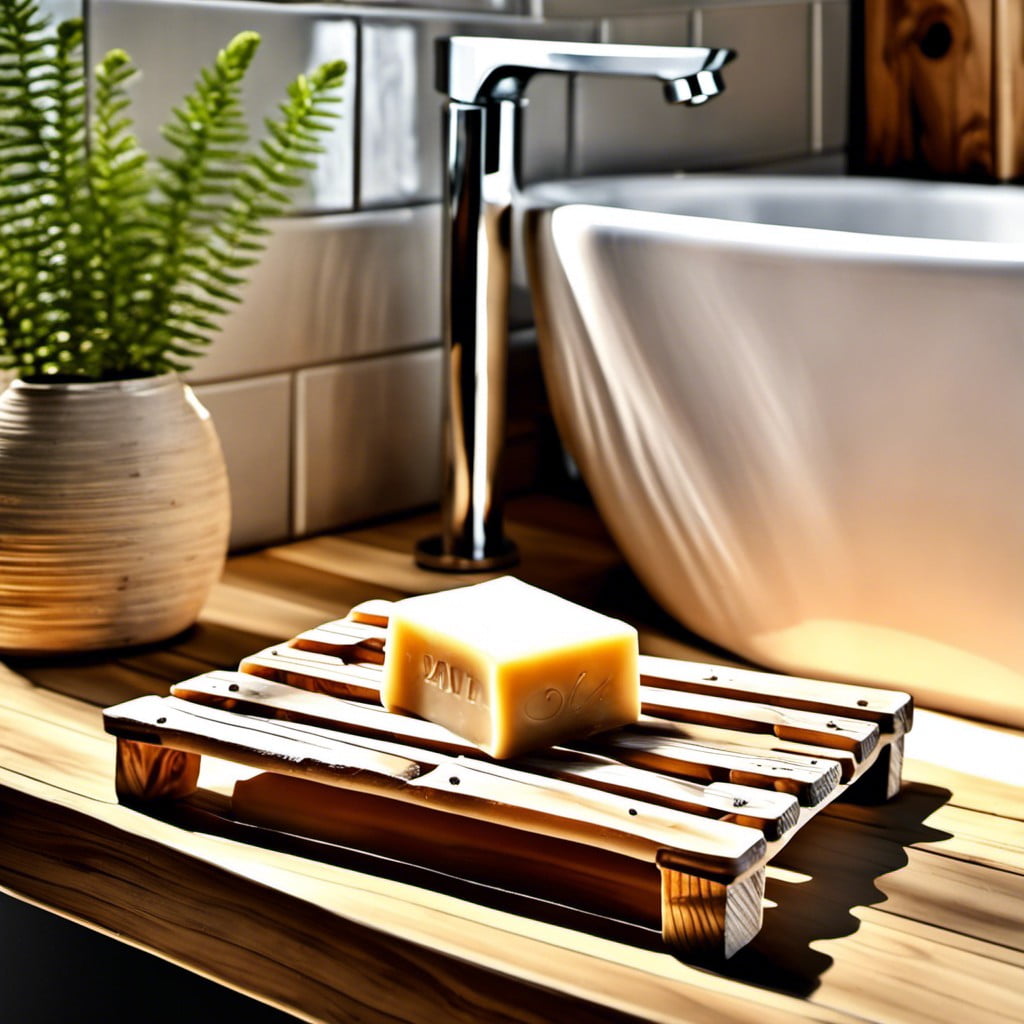
Moving on to our next transformative idea! A pallet soap dish can enhance the rustic appeal of your bathroom. Here’s how to implement this idea:
1. Select a small, narrow pallet plank: This will serve as your base. Its length depends on the size of your soap.
2. Choose two smaller pieces: These will become the supports, ensuring your soap doesn’t slide off the dish.
3. Sand the pieces: Make them smooth to avoid any chance of splinters.
4. Use wood glue to attach the supports to the base: Be sure to place them on the ends. Allow it to dry.
5. Apply a waterproof finish: This preserves the wood, preventing water damage or mold growth.
Remember, the soap dish should be durable with the ability to drain – no one likes soggy soap! This innovative idea not only serves a practical purpose, but also, adds a unique touch to your bathroom décor.
Pallet Mat
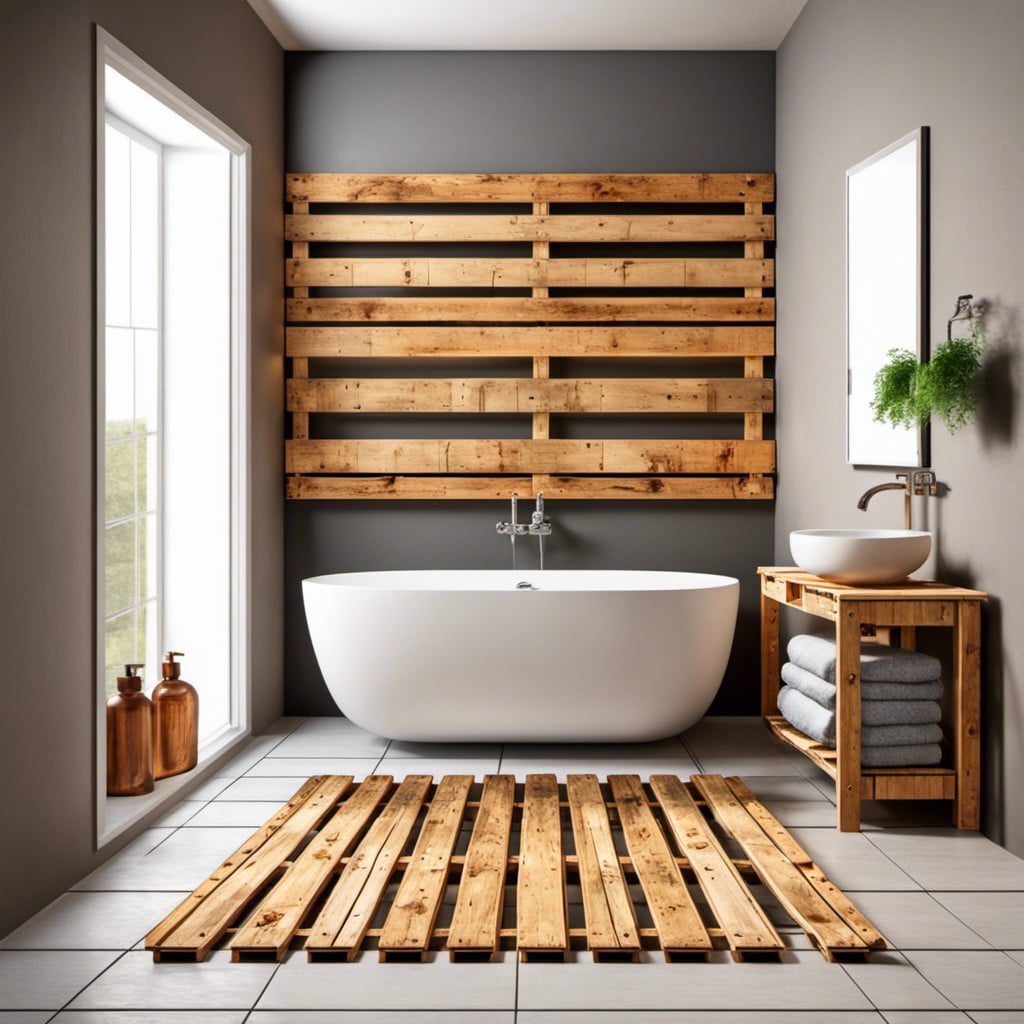
A mat made from pallets offers a unique and rustic aesthetic to your bathroom floor. This eco-friendly option utilizes repurposed wood, reducing waste and promoting sustainability.
1. Durability: Pallet wood is known for its strength, able to withstand daily wear and tear. This means your mat will last you for a long time.
2. Customizable: You can easily resize, paint or stain the mat to fit your specific style and needs.
3. Non-Slip: By adding a non-slip pad under the mat, you can ensure further safety and comfort.
It’s important to seal the wood properly to make it waterproof and rot-resistant. Using outdoor wood sealer makes it easy to clean and safe from water damage.
Don’t forget, the mat must be designed with comfort in mind. Sand the wood thoroughly to avoid any potential splinters and ensure the most pleasant possible experience when stepping on it barefoot.
Creating your own pallet mat also gives you the chance to experiment with various finishes and textures, allowing your creativity to shine and adding a personal touch to your bathroom.
Browse More
 Gray Bathroom Cabinets: What Color Walls Complement Best
 What Is a Vanity and Why You Need One
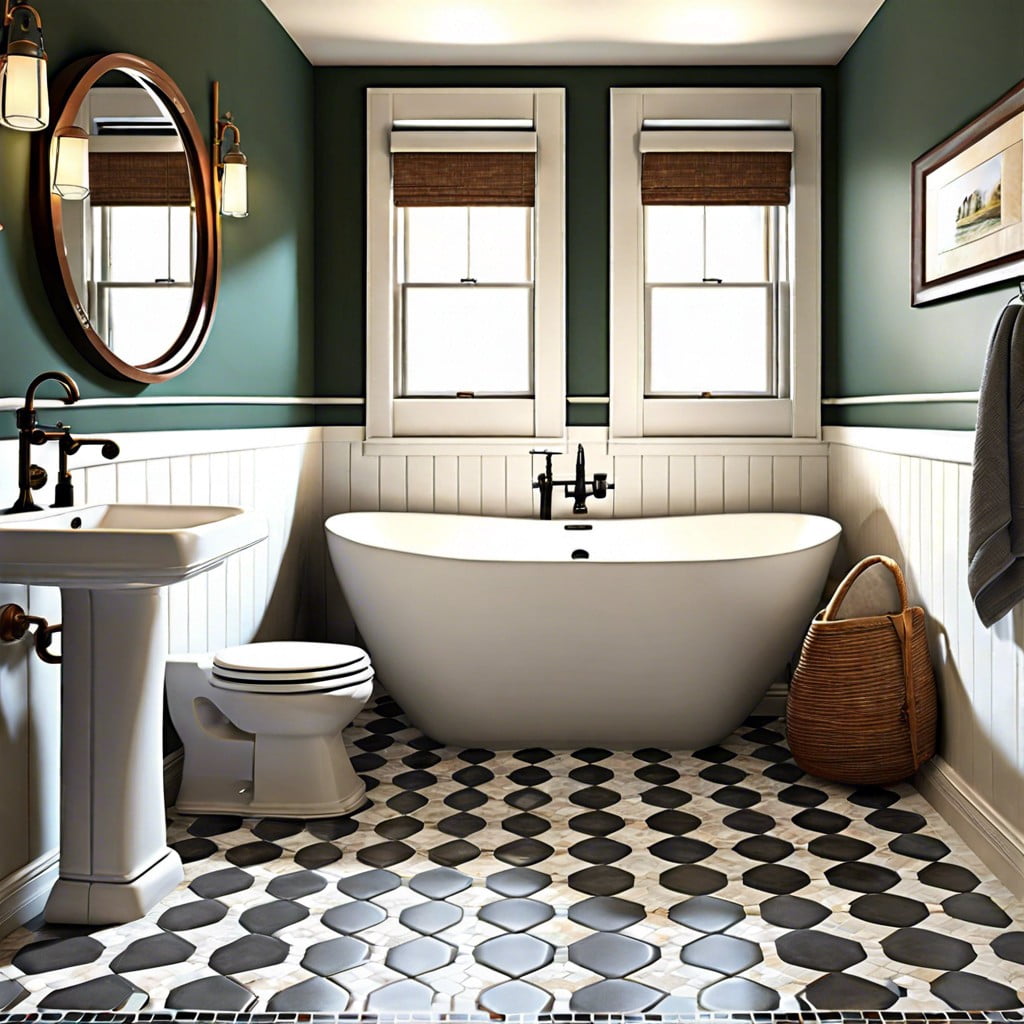 15 Ideas: What is the Best Flooring for a Small Bathroom
 What is a Half Bath: Maximizing Your Home’s Space
 Best Flooring for Bathroom: Your Essential Buying Guide
Recap