Last updated on
Embarking on a DIY renovation project can be a rewarding venture, transforming your space into a personalized sanctuary. However, once the dust settles and the tools are put away, the daunting task of post-renovation cleaning looms.
It’s essential to approach this final stage with purpose and efficiency to ensure your renovated area is not only visually appealing but also safe and hygienic. In this guide, we’ll walk you through effective strategies to tackle the cleanup process, leaving your living space in pristine condition, ready for you to enjoy your newly transformed home.
Initial Cleaning Steps

Gather your cleaning supplies before you start the post-renovation cleanup. You’ll need items such as heavy-duty trash bags, brooms, a vacuum with a HEPA filter, a mop, a bucket, and cleaning solutions. Begin by removing all the larger debris and trash left from the renovation.
Open windows to ensure proper ventilation as you work. You can find house clearance services in Reading or your local area to assist with the removal of larger items. This step may involve dismantling and disposing of any construction materials, packaging, and leftover paint cans.
Once the trash and debris are out of the way, it’s time to combat the dust. Dust can settle on every surface in your home, not just where the renovation took place. Wipe down all surfaces with a damp cloth, starting from the top of the room and working your way down to prevent dust from falling onto already cleaned areas.
After addressing the surfaces, focus on the floors. For carpeted areas, vacuum thoroughly using a HEPA filter vacuum to trap fine dust particles. For hardwood or tile floors, vacuum to remove any loose particles and then follow up with a damp mop to ensure all dust is removed. Remember to rinse your mop frequently to avoid spreading dirt and debris.
Deep Cleaning Walls and Ceilings
Now that the obvious areas have been cleaned, attention moves to walls and ceilings. Dust and debris can stick to these vertical surfaces, and paint or adhesive residue may also be present. Use a gentle cleanser appropriate for your wall’s finish and a sponge or cloth to lightly wipe down the walls, always testing on a small inconspicuous area first.
Ceilings can be trickier to clean due to their height and the potential of ceiling fixtures. Safely use a sturdy ladder or an extendable duster to reach these high areas. If you find any spots or stains, carefully treat them with a solution that is safe for your ceiling’s material and paint.
Cleaning Air Vents and Replacing Filters
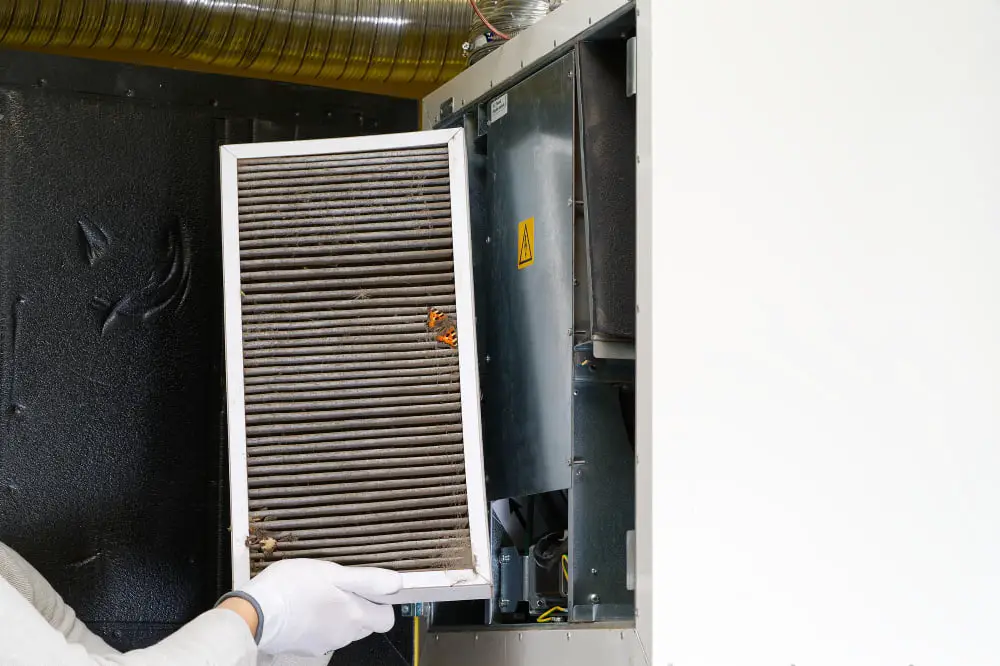
After renovations, air vents can contain a significant amount of dust that could circulate back into your living space if not properly cleaned. Remove vent covers and use a brush attachment on your vacuum to clean out as much dust as possible from the ductwork. If the covers themselves are dirty, wash them with soapy water and let them dry before reattaching.
It’s also a critical time to replace any air filters in your central heating and air conditioning system. A new filter will be more efficient in trapping renovation dust and maintaining clean airflow throughout your home. This step will help ensure better indoor air quality and prevent dust from spreading in the future.
Detailing Kitchens and Bathrooms
Kitchens and bathrooms require special attention during post-renovation cleaning due to their frequent use and the presence of appliances and fixtures.
In the kitchen, start by wiping down cabinets, countertops, and backsplashes with an appropriate cleaner. Don’t forget the interiors of cabinets and drawers, as dust can settle where you least expect it. Next, clean your appliances inside and out, including the refrigerator, oven, microwave, and dishwasher.
For bathrooms, sanitize all surfaces, including the tub, shower, sink, and toilet. Pay special attention to tiled areas where grout may have collected dust. Clean mirrors and glass surfaces with a streak-free product to ensure clarity and sheen. Lastly, wash any linens such as shower curtains or bath mats that have been exposed to renovation dirt.
Final Touches Before Settling Back In
The final stage of post-renovation cleaning involves those finishing touches that make your space feel truly clean and comfortable.
Inspect your furniture and decorative items before bringing them back into the renovated area. Dust or clean each piece as necessary. You may want to place felt pads on the bottom of furniture to protect your newly refinished floors when moving them back into place.
Refresh your space with clean linens, curtains, and any fabric items that may have been packed away during renovations. Wash or dry-clean these items to remove any lingering dust or odors absorbed during the project.
The Takeaway
Cleaning your house after a DIY renovation project is essential to ensure a safe and hygienic living environment. By following these steps and using effective cleaning methods, you can achieve a sparkling clean home that showcases your hard work and dedication. Remember to prioritize safety when handling any construction materials and always test cleaners on small areas first before applying them to larger surfaces.
Browse More
 How to Style Your Patio for Outdoor Entertaining
 How to Find the Best Discounts on High-Quality Vanity Mirrors
 How to Choose the Right Service for Your Root Sewer Needs
 Best Tools for Your Replacement Water Pumps Project
 From Quick Fixes to Lasting Solutions: Why Professional Pest Removal Is worth It
Recap