Last updated on
Explore these unique lighted wine bottle ideas because they can effortlessly transform your home into a stylish, ambient abode.
Illuminate your home with a touch of elegance using lighted wine bottles. This article will guide you through a variety of creative and simple ways to transform your empty wine bottles into stunning decorative pieces.
From a cozy table lamp to a twinkling centerpiece, these DIY ideas will not only repurpose your bottles but also add a warm, inviting glow to your space.
Whether you’re a DIY newbie or a seasoned crafter, you’ll find these projects manageable and rewarding.
So, let’s dive in and explore these brilliant lighted wine bottle ideas together.
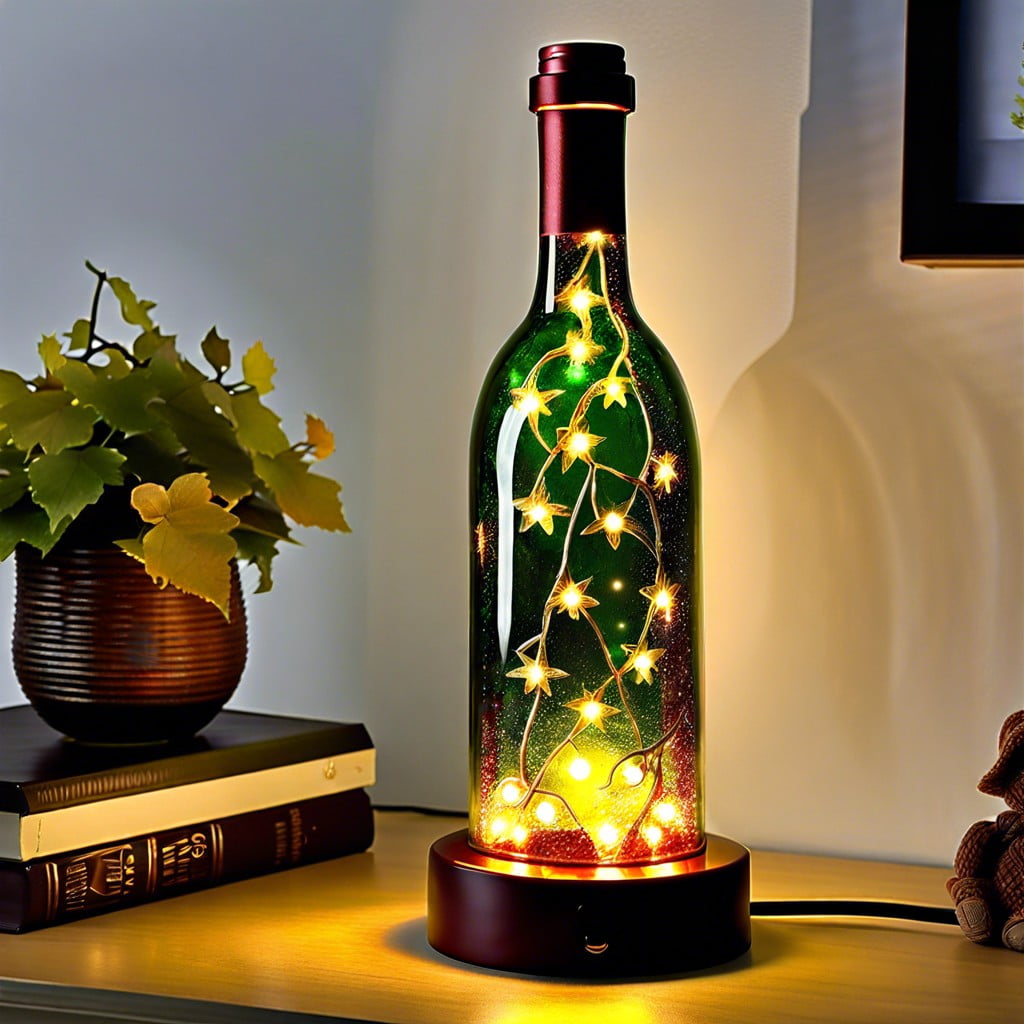
Fairy Light-filled Wine Bottle
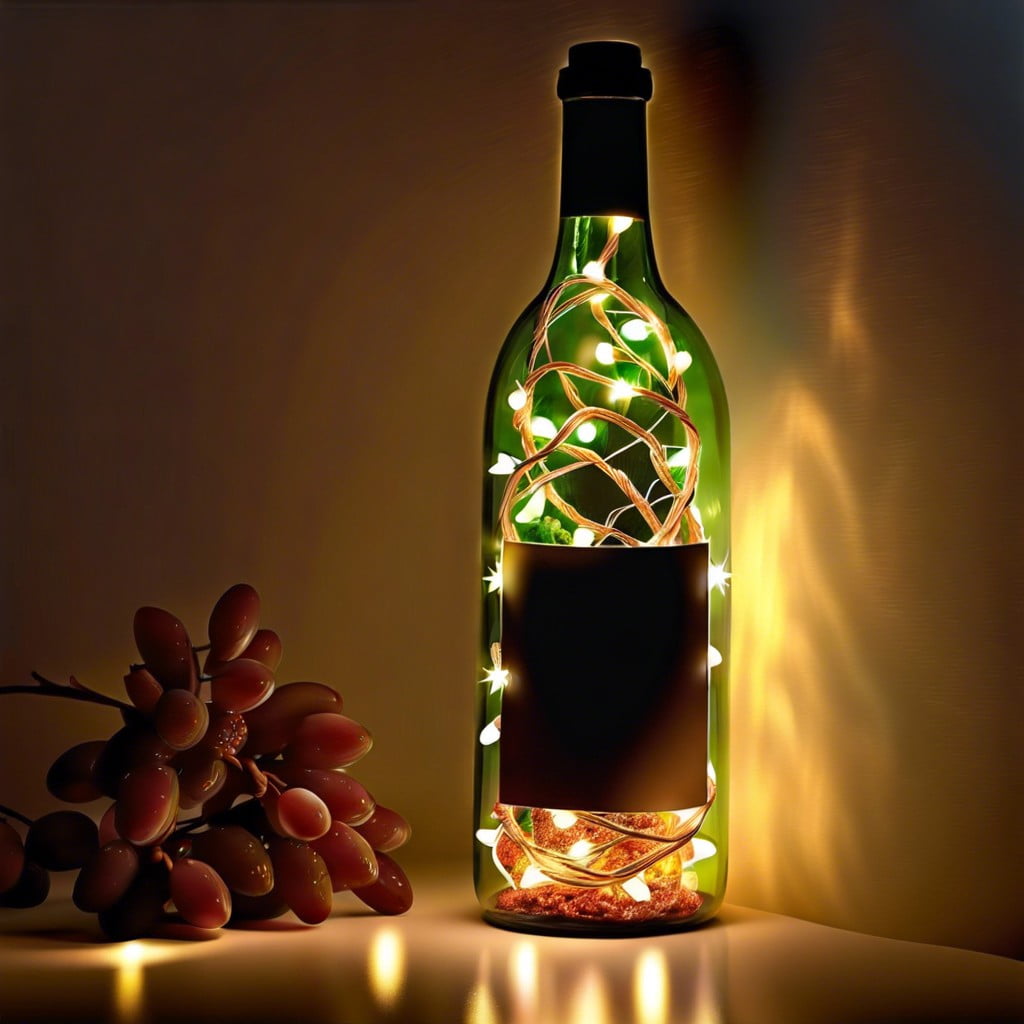
Creating this magical decor is a breeze. Pick up a string of fairy lights—opt for warm white hues for a cozy ambience or bold colors if you’re seeking a vibrant statement.
The thinner, flexible wiring makes it easy to manipulate inside the bottle. A simple trick to get the lights evenly distributed is to bunch them up, and then insert into the wine bottle. Ensure the battery pack stays outside, hidden behind or beneath the bottle.
The result is an enchanting sparkle that provides an inviting and whimsical glow. Perfect on a coffee table, kitchen counter, or as a unique night light. It’s also a great conversation piece when entertaining guests.
Wine Bottle With Color Changing LED Lights
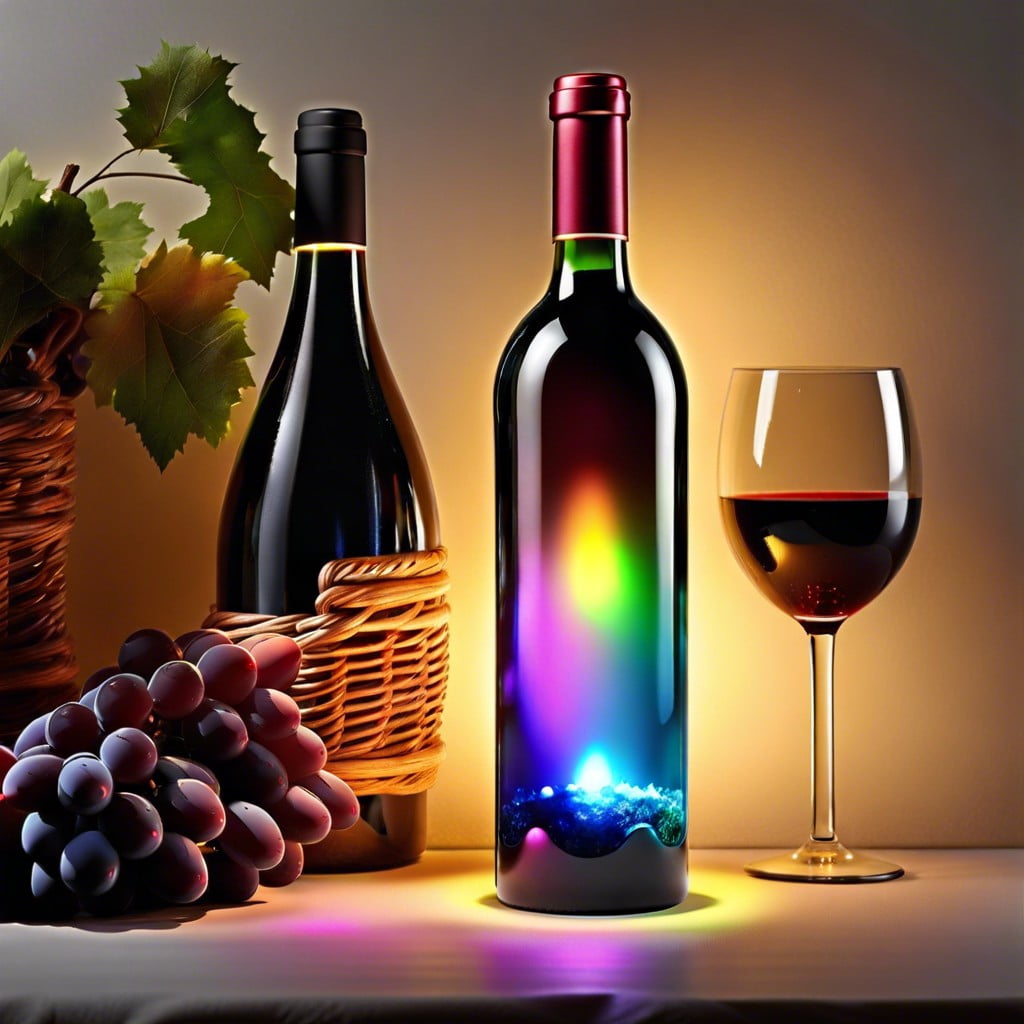
Dive directly into a world of mesmerizing lights with this innovative use for an old bottle. You’ll need color changing LED strip lights, known for their adjustable hues and energy efficiency. Trim them to fit the size of your bottle, and drop them in – it’s as simple as that!
A cut diamond hole at the base of the bottle keeps the setup tidy, with no wires protruding from the top. Control the lighting remotely to match your mood or the ambiance of any room.
The lights’ low heat emission makes this a safe DIY project. One could even add decorative items like glass beads inside the bottle, highlighting the refractive beauty while the lights dance from color to color. Thus, making it a versatile centerpiece suitable for any occasion just with a simple click.
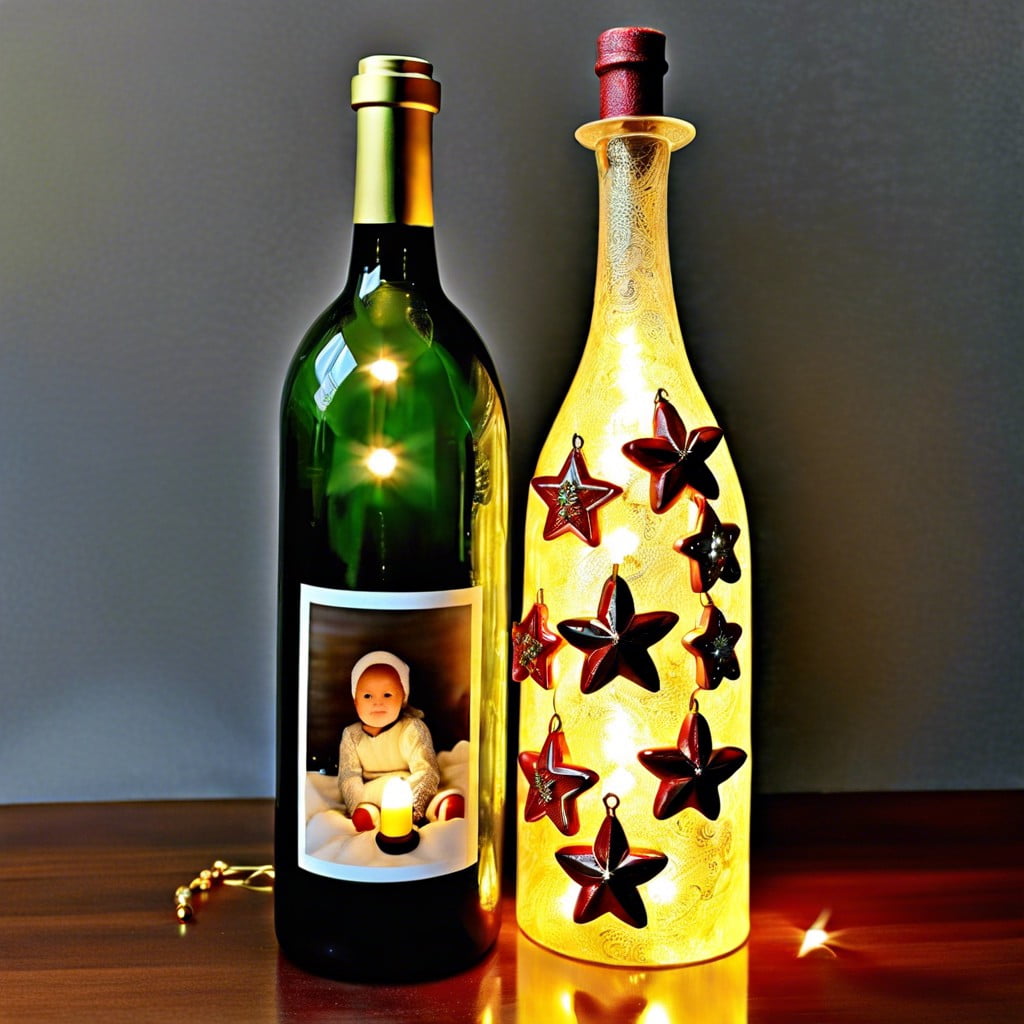
Photo Holder Wine Bottle Lamp
Integrated with LED string lights, the emptied glass preserves both precious memories and a warm glow. Special photos can be rolled and inserted, providing an original backdrop for radiance.
Here’s how to achieve this effect:
- 1. Select photos and adjust size: Photos should be clear and reduced down to fit the bottle properly.
- 2. Prepare bottle: Before starting, ensure the wine bottle is clean, dry, and label-free.
- 3. Insert lights: Feed a string of small LED lights into the bottle. Battery-operated ones are a preferred choice.
- 4. Add photos: Roll selected images and carefully push them into the bottle. Unroll them using a thin rod or pencil.
- 5. Secure and display: Place the battery pack at the bottom, secure the cork, and enjoy the personalized glow from your photo holder wine bottle lamp.
Remember, patience is a significant part of crafting. Don’t rush, to ensure every photo is placed just right.
Terrarium Wine Bottle Light
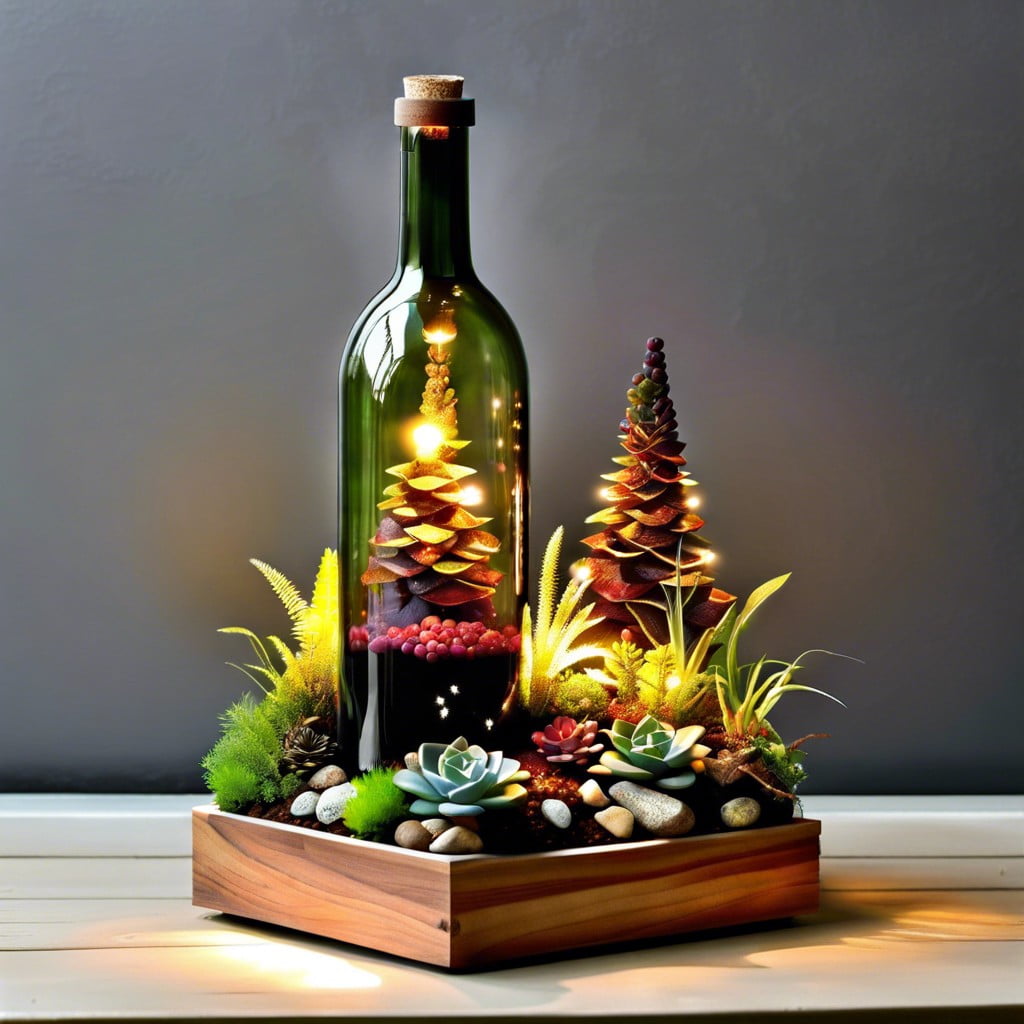
Crafting a Terrarium wine bottle light is sure to add a fascinating element to your decor, creating a magical miniature garden within a bottle. To achieve this:
1. Choose a clear, clean wine bottle and a string of miniature fairy lights.
2. Select small, slow-growing plants like succulents or air plants that require minimal water and maintenance.
3. Add a layer of pebbles at the bottom of the bottle for drainage, followed by activated charcoal to prevent odors, and then potting soil.
4. Use tweezers to carefully place your plants, and sprinkle more soil top, gently tapping it down.
5. Snake the fairy lights inside, leaving the battery pack outside the bottle.
6. Seal the bottle with a cork and turn on the lights for an enchanting glowing terrarium.
Glittery Lighted Wine Bottle
To create a statement piece for your décor, try adorning your light-filled bottle with glitter. The subtle sparkle reflecting against the bottle’s curvature combined with the internal glow brings a real magic touch.
1. Choose a color scheme: Match your glitter with the color palette of the room where it will be displayed.
2. Prep the bottle: Thoroughly clean the interior and exterior of your bottle – any dust or residue might affect your end result.
3. Apply adhesive: Coat the outer surface of the bottle with a thin layer of adhesive or decoupage medium – a foam brush should do the trick.
4. Glitter application: Once your adhesive is tacky, generously sprinkle your glitter over the bottle. Remember to shake off the excess.
5. Sealant: Once the glitter and adhesive are fully dry, seal your work with a clear spray sealant to ensure your glitter stays put.
6. Insert lights: After everything is completely dry (including sealant), feed a string of LED lights into the bottle. Opt for battery-operated lights to avoid unappealing cord visibility.
Remember, the more glitter you use, the less light will shine through, so balance according to your preference. This DIY project truly combines the enchantment of lights with the allure of sparkling glitter.
Twine Wrapped Wine Bottle With Lights
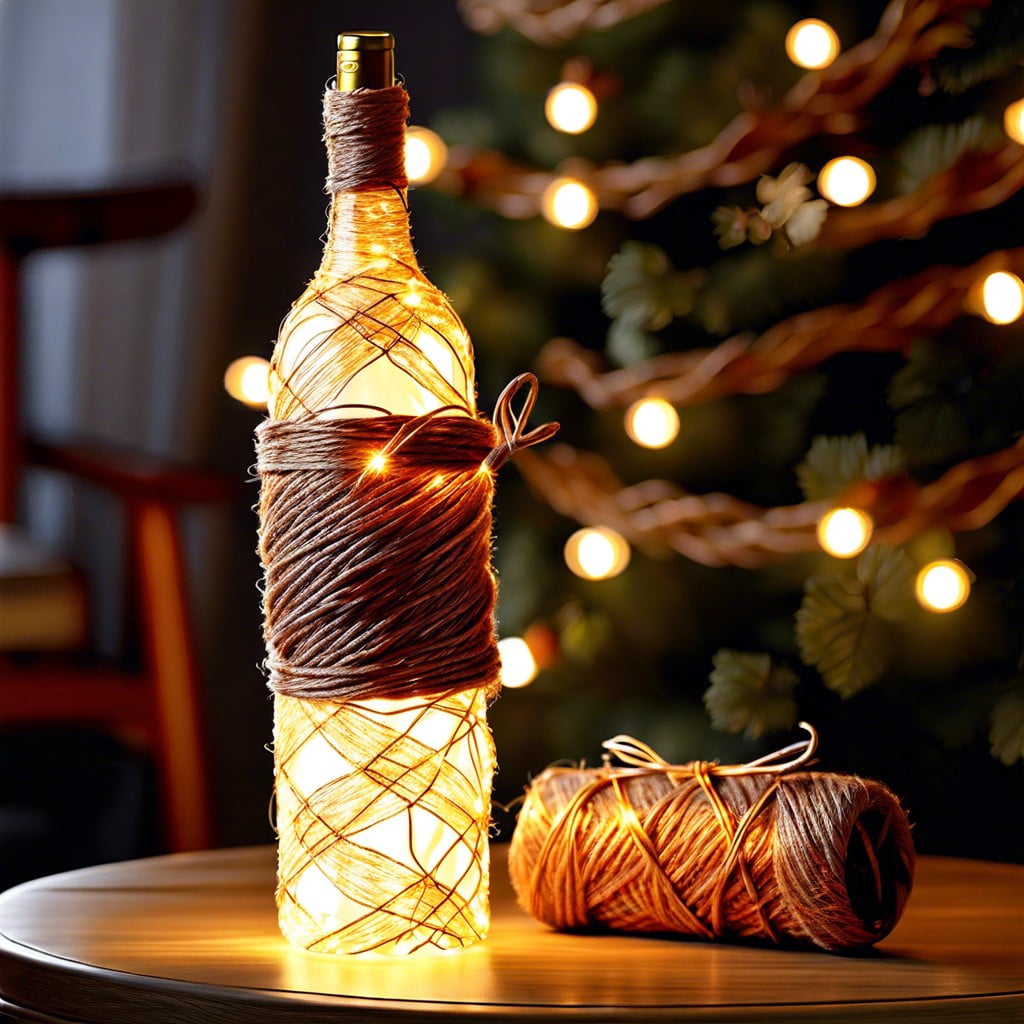
Incorporating twine adds a rustic feel to your lighted wine bottle, making it perfect for homes that favor farmhouse or cottage-style décor. By wrapping your selected wine bottle with twine, you create a charmingly textural contrast against the smooth surface of the glass. The light from within then shines through the gaps with a warm, welcoming glow.
Creating this effect involves some simple steps:
- 1. Gather your wine bottle, twine, glue, and lights.
- 2. Start from the bottom of the bottle, apply glue, and wrap the twine tightly around, ensuring the wraps lie flush against each other.
- 3. Continue up the bottle until it’s fully wrapped. Let the glue dry properly.
- 4. Insert a string of lights into the bottle, securing the battery pack and switch in an accessible place.
Remember to pick a string of lights that complements the color of your wine bottle and twine! Now, not only do you have a practical light source, but an attractive piece of homemade décor as well.
Wine Bottle Chandelier

Creating an unconventional lighting piece is easier than it appears. A standout amongst the popular repurposed wine bottle ideas is the chandelier. This eye-catcher can be crafted using the same color or differently colored bottles, depending on your desired aesthetic. The bottom of each bottle gets cut out, allowing light to come through. They are then hung upside down from a metal or wooden board.
Key things to remember when creating your wine bottle chandelier:
- Ensure the bottles are properly sanded to avoid sharp, dangerous edges.
- Secure the bottles tightly to the base to avoid them falling.
- You can use either candles or electric lights. Ensure any cables are discreetly run.
- Customize the look by selecting a board that complements your home’s décor.
- The chandelier can be as big or as small as you want it to be, simply adjust the number of wine bottles.
This project requires extra care but the result is a one-of-a-kind masterpiece setting your décor far and apart from the usual.
Lighted Wine Bottle Wall Décor
Creating this piece isn’t as daunting as it might sound. It involves string lights, a clear wine bottle, and a bit of creativity. Here’s how:
1. Begin by cleaning the inside of the bottle and allowing it to dry.
2. Drill a hole near the base of the bottle for the light cord exit.
3. Insert a strand of LED string lights into the bottle through the top, ensuring the end of the cord falls out through the drilled hole.
4. Mount the wine bottle to the wall using sturdy wine bottle holders or brackets, making sure the drilled hole faces the wall, so the cord is invisible.
5. The LED light cord can be plugged into a hidden socket for a seamless, glowing piece of art.
6. It’s important to note that LED lights are preferable due to their lower heat output, making them safer to use.
Remember that arranging multiple bottles together can form an eye-catching wall feature that’s sure to impress visitors. Picking diverse wine bottle colors and sizes can add an attractive contrast to your wall décor.
Wine Bottle With Flameless Candle Lights
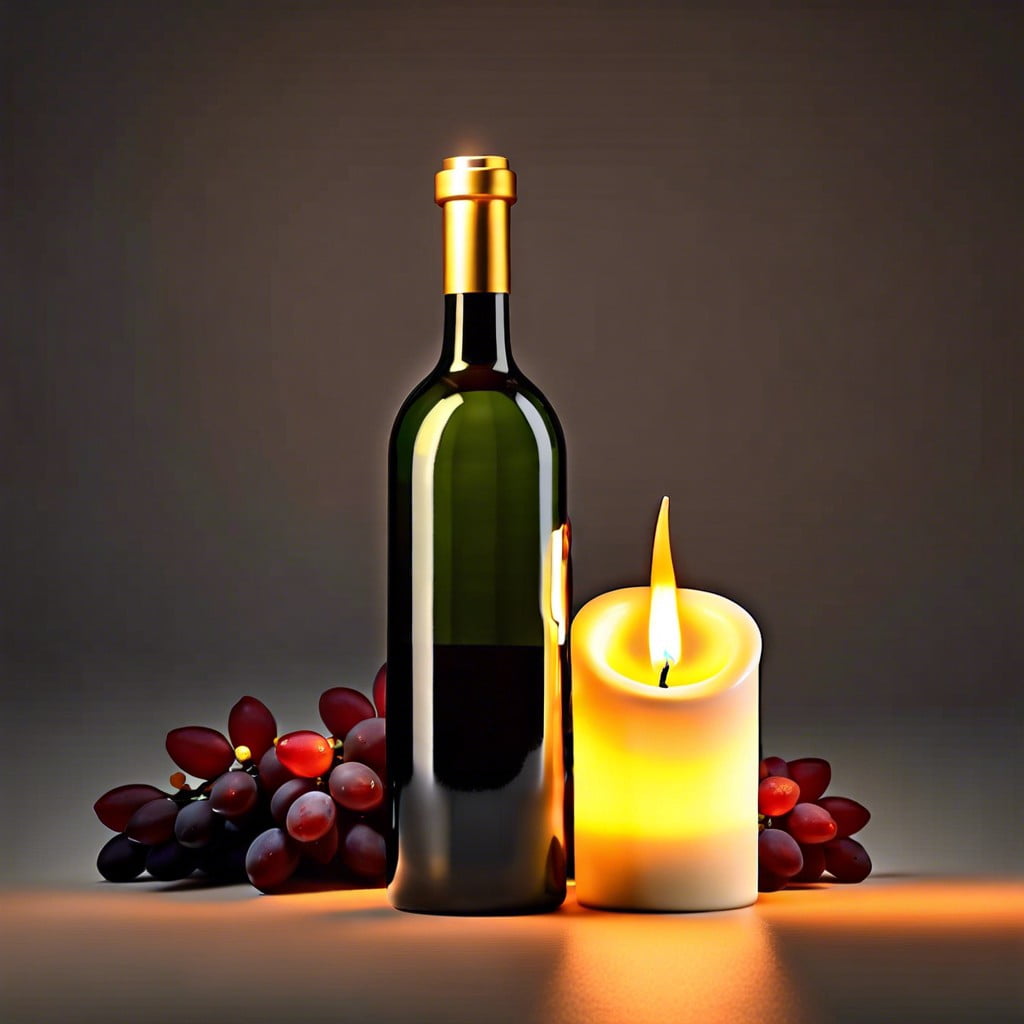
Initiating this lovely illuminator is as simple as it sounds! First, opt for a clear, clean wine bottle to achieve the best glow. Carefully place a flameless LED candle of desired color into the bottle. Flameless candles pose no fire risk, making this a safer option compared to traditional candles. They also last for hours, ensuring that beautiful glow does not fade too soon.
To add a personal touch, consider wrapping the exterior of the bottle with a ribbon or attaching a custom-made label. This project is not only great for home décor, but it also makes a unique gift for family and friends. Keep in mind it turns out most charming when displayed in darker spaces like a moody living room or a cozy bedroom.
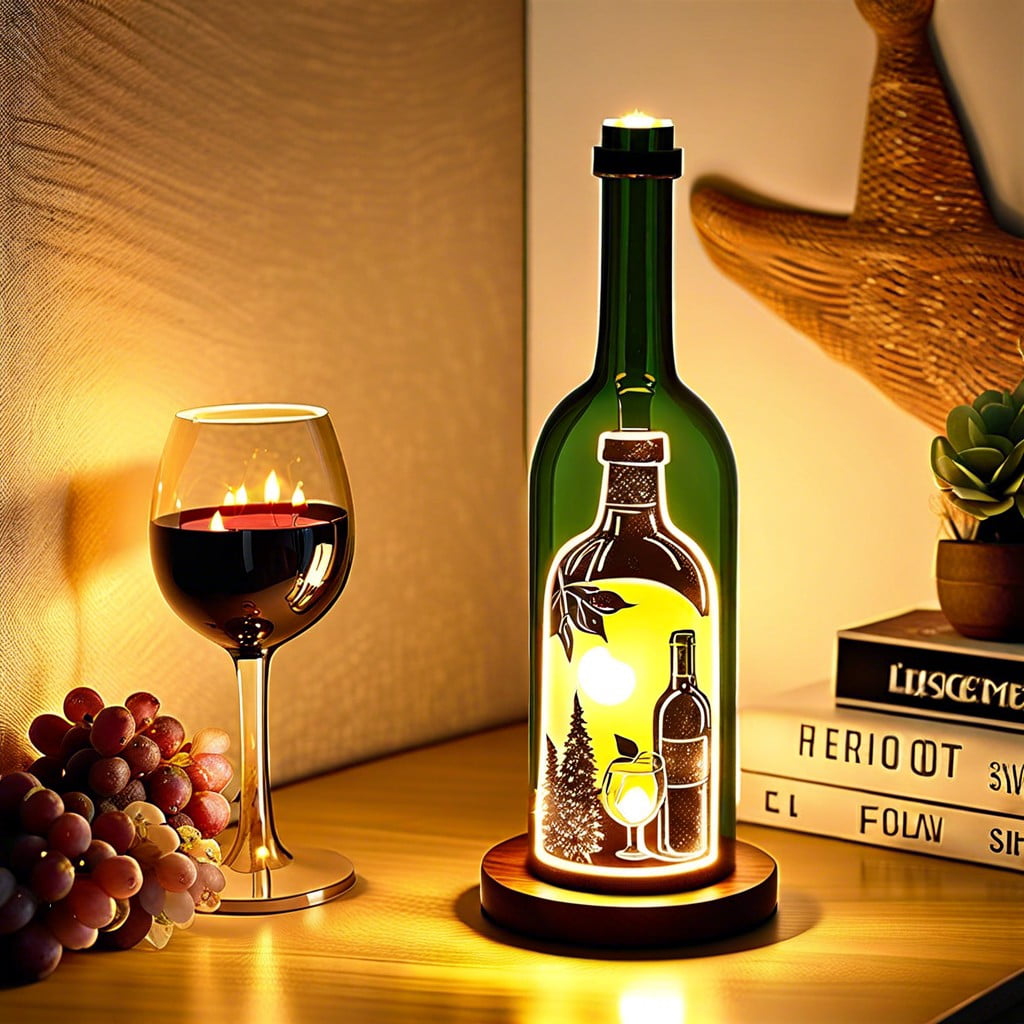
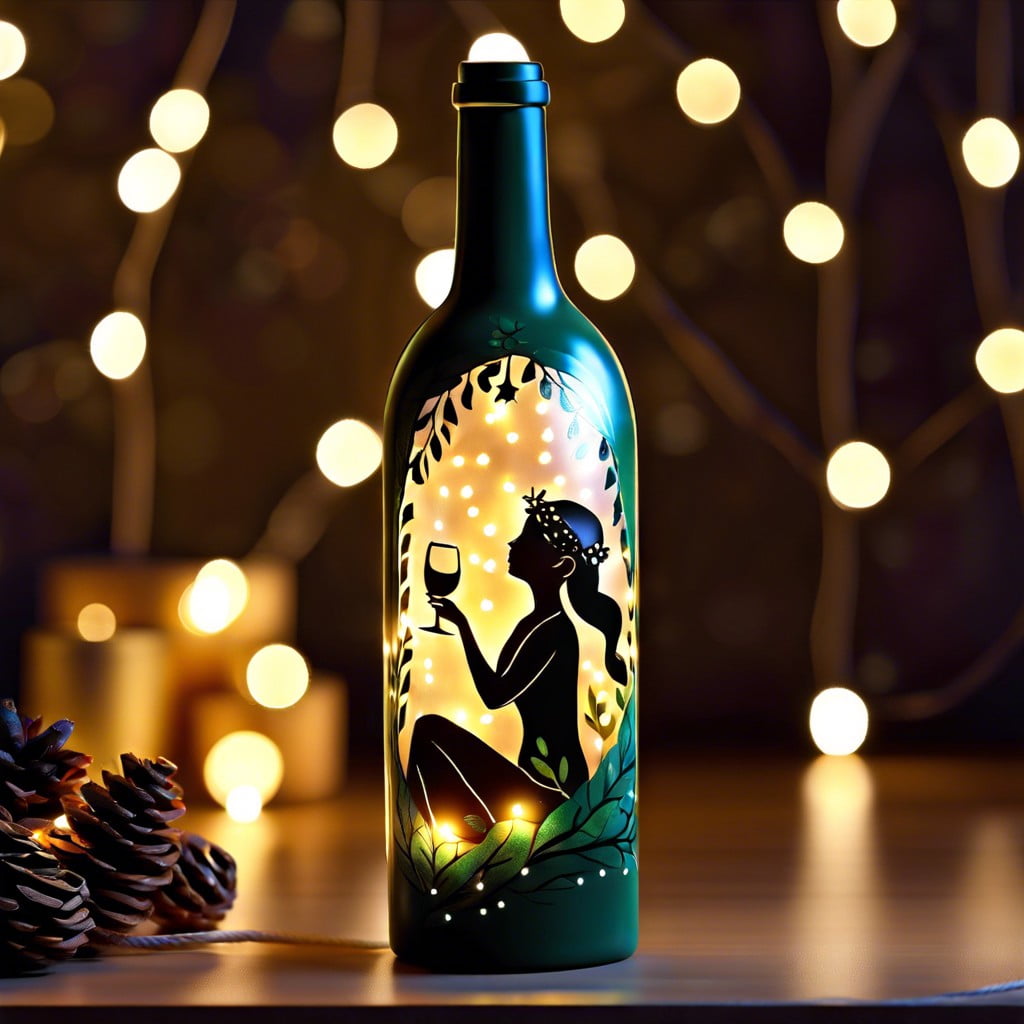
Lighted Wine Bottle With Silhouette Art
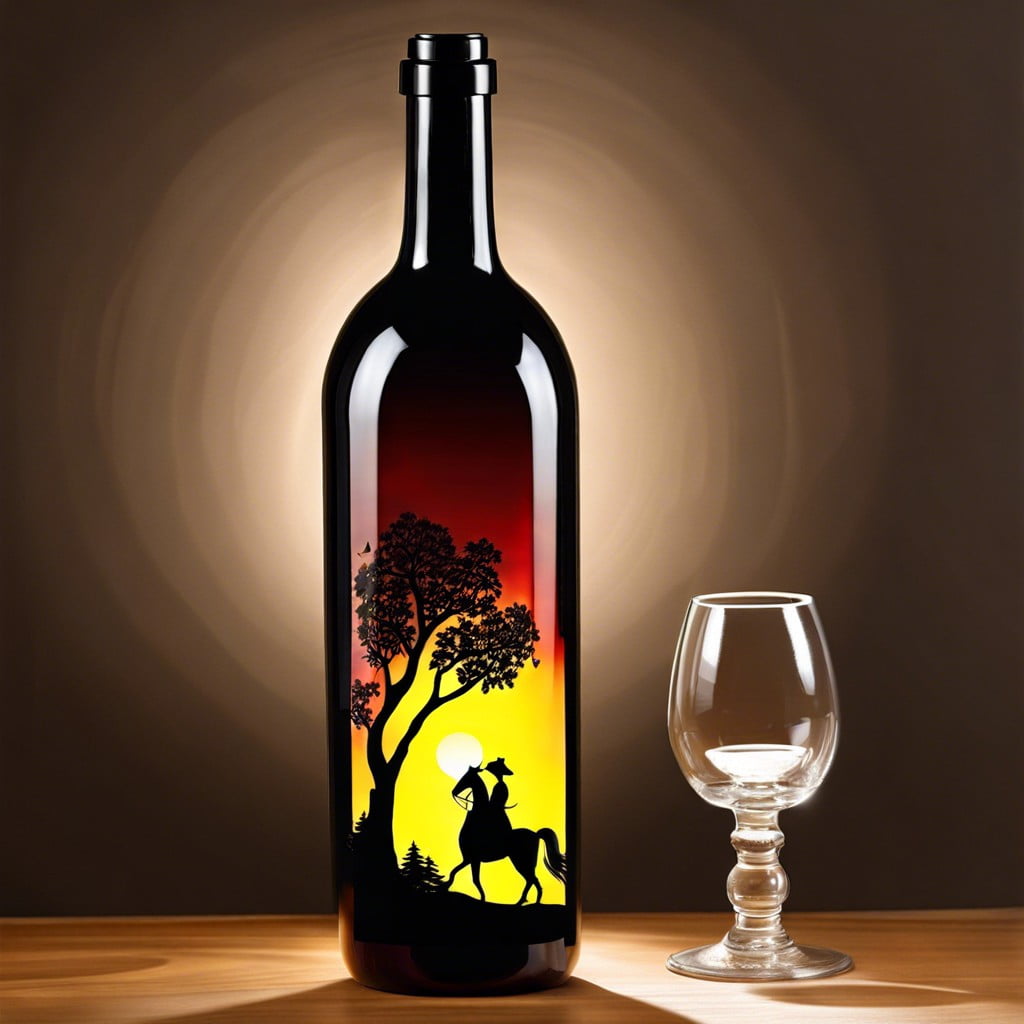
First, choose a clear wine bottle for the best visibility of your silhouette art. A bottle with minimal labelling or etching would work best. Your silhouette can be a self-made stencil or a ready-made one, depending on your preference and artistic abilities.
To begin, attach the silhouette stencil to your bottle using some adhesive. Then proceed to paint over your stencil using a small paintbrush. Use a dark colour like black or navy blue for a crisp silhouette effect.
While your paint is drying, it’s time to prepare your lights. Opt for LED string lights for their brightness and efficiency. A neutral colour like white or warm yellow will showcase your silhouette art best.
Once your bottle is dry, you can start adding the lights. Insert the string of lights into the bottle, distributing them evenly. Some people find using a long stick or dowel helpful in evenly distributing the lights.
For a more noticeable effect, you can keep the bottle plugged in when lit. This will create beautiful silhouette shapes in the room. This bottle art not only serves as a light source but also as a fascinating piece of table art.
Remember to ensure safe use of electronics with this craft, keep it out of reach of children and ensure it’s not left unattended at any time.
Wine Bottle Nightlight
Creating a wine bottle nightlight requires an empty wine bottle, a string of small LED lights, and a drill with a diamond tipped bit.
Cleaning the wine bottle thoroughly is essential before starting the crafting process.
After drying the bottle, drill a small hole near the base where the LED string light’s power cord will exit.
The hole’s size should be minimal to maintain the bottle’s structural integrity.
Put the string lights into the bottle from the top, ensuring the power cord comes out through the hole at the base.
The LED lights are energy efficient, creating a warm, cozy glow without heating up the bottle.
This lighting craft provides subtle illumination perfect for setting an intimate nighttime ambiance.
Lighted Wine Bottle With Charms
Incorporating charms adds a personal touch to your lighted wine bottle. Decide on a theme that suits your style or home décor, perhaps beach-themed charms for a nautical style or heart shapes for a romantic feel. Dangle these from the neck of the bottle using a pretty ribbon or cord.
The lights inside provide a beautiful backdrop for your charms. Opt for battery-operated fairy lights for an enchanting effect. These are usually available with a clear wire, which is unobtrusive and lets the focus remain on the charms and the ambient glow.
Make sure to choose charms of varying sizes and shapes for added interest. They can be metallic, wooden, gemstones, or even tiny photo frames. Whatever you choose, they will add a decorative edge to your lighted wine bottle.
To install the lights, use a diamond-tipped drill bit to create a small hole in the bottle’s base. Do this safely by securing the bottle and wearing goggles. Thread your fairy lights into the bottle. Be sure to clean your bottle thoroughly before starting to ensure there are no wine residues left inside.
Always make sure you turn off the lights when not in use. Battery-operated lights are very safe but, like all electrical items, should be used with care.
Lighted Wine Bottle Centerpieces for Events

For an unforgettable event centerpiece, here’s a creative twist: fill your empty wine bottles with string lights. The lackluster process of battery operation can be taken care of by using battery-operated lights. The long, thin battery packs can be discreetly slipped into the bottles.
Next, choose a coordinating color or mix different hues. Warm orange lights, for instance, create an enchanting, cozy atmosphere at fall or winter gatherings. Cool blue or green lights, on the other hand, make for aesthetically pleasing centerpieces at summer parties.
If you want to add a realistic touch, why not adorn each bottle with a matching table number or name. Not only will this cover the base of lighting, but will also take care of your guest orientation.
Play around with the setting of the table. A vintage lace tablecloth or a wooden table runner could be added to enhance the rustic charm. Alternatively, opt for sleek glass vases filled with flowers matching your chosen light color for a sophisticated and modern setup.
Remember, the key is to experiment and personalizing your décor to your preference. No one knows your event better than you!
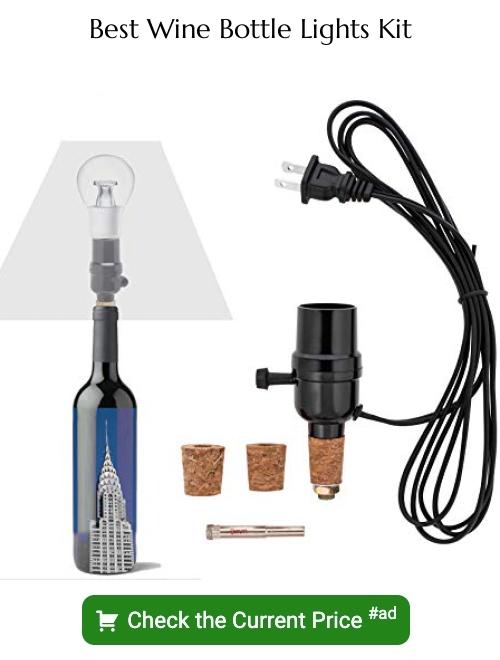
Wine Bottle Lamp With Shade
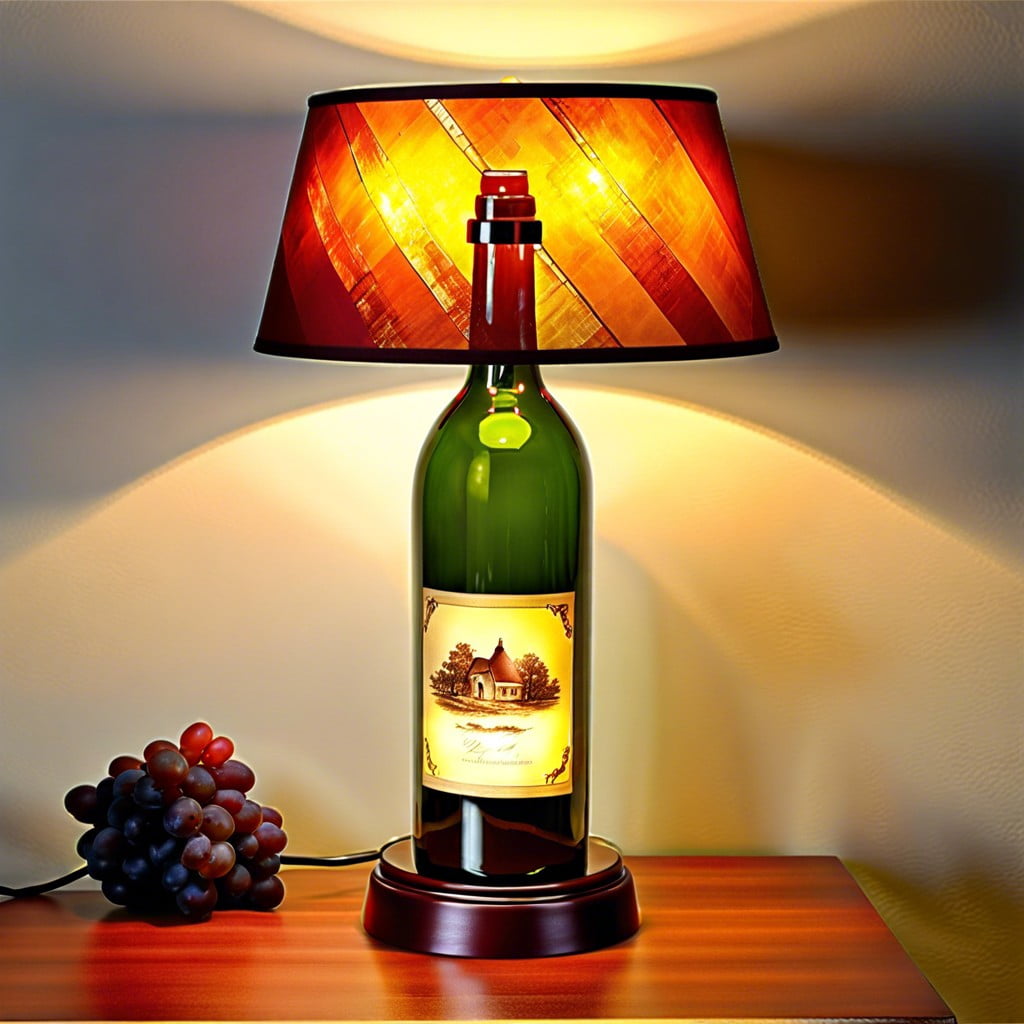
Getting started on this upcycling project won’t take much effort, but can certainly add a chic touch to your finely appointed room. Primarily, you would need an empty wine bottle, a lamp kit, a drilled stopper, and a shade that perfectly complements the aesthetic of your space.
1. The bottom part of the lamp is the wine bottle.
2. An appropriate lamp kit must be properly installed.
3. Place a well-drilled stopper on top of the wine bottle.
4. Fixate the lamp shade with respect to the stopper for balance.
5. Ensure the lamp kit switch is near the neck of the bottle for easy on/off access.
A variety of lamp shade designs—be it contemporary, classic, or quirky—can harmonize with the room theme. The customization limits are boundless, from selecting the bottle color, lamp shade design, to the bulb type that emits a specific light warmth. This simple yet artistic bottle lamp can make your room feel homier while lending an air of elegance.
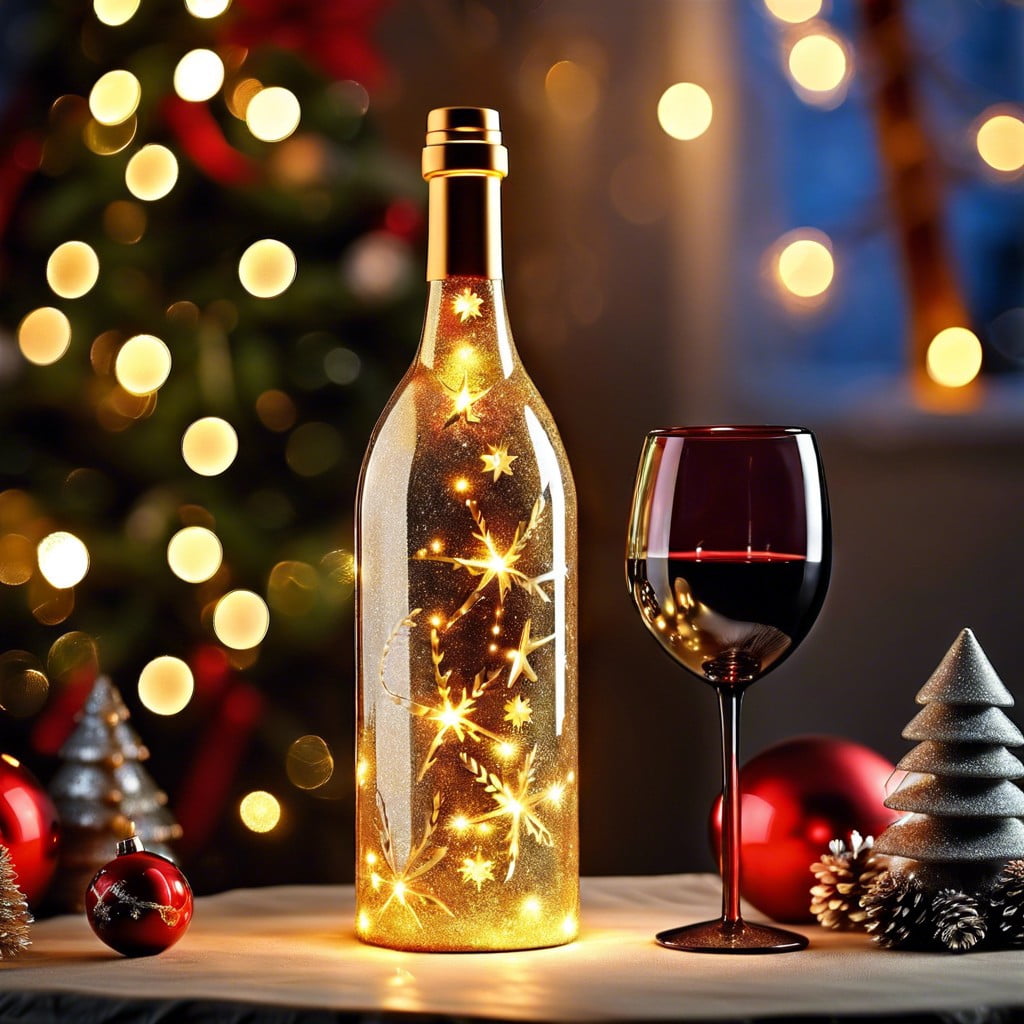
Wine Bottle With Holiday-themed Lights
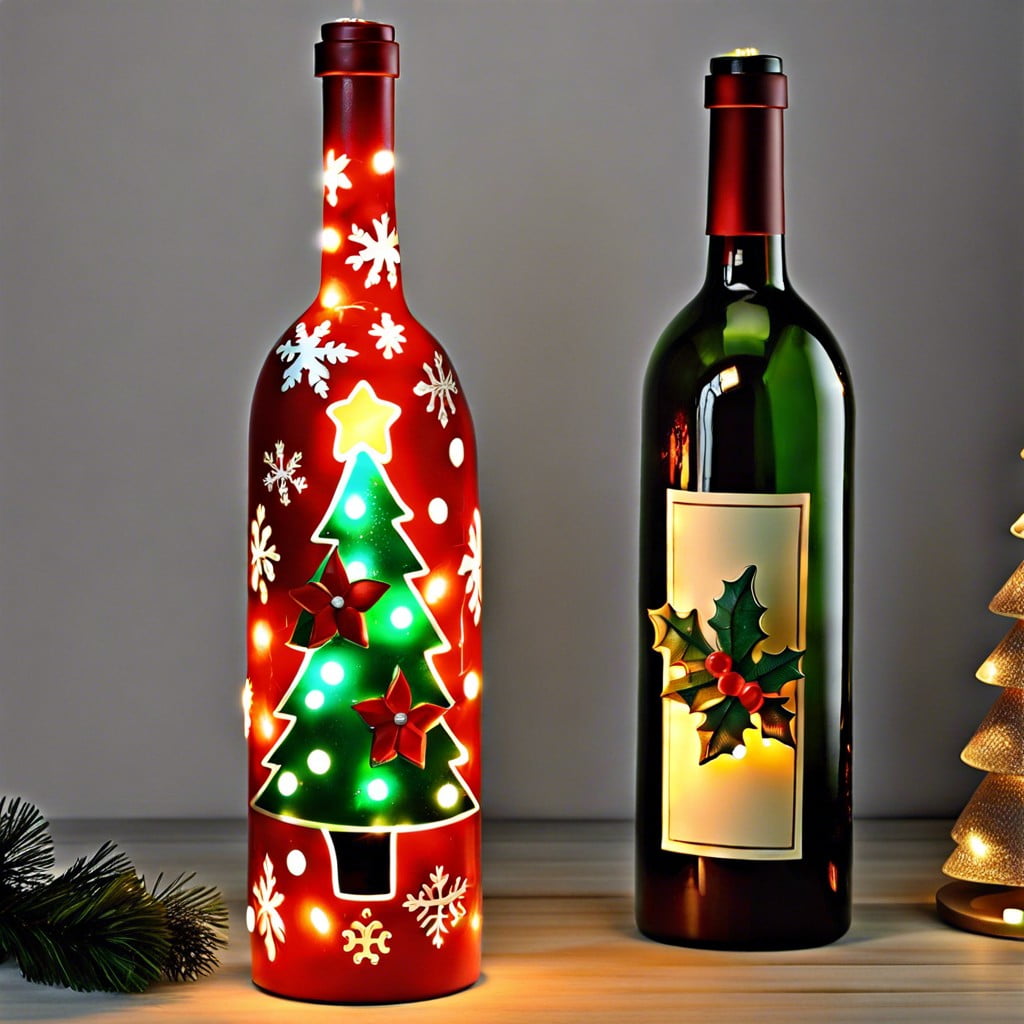
Injecting a festive vibe into your space, holiday-themed lights in wine bottles offer a dual advantage. They not only provide unique decoration but also serve as a fantastic recycling project.
Here are the pointers to guide you through:
- 1. Gather a wine bottle, holiday-themed LED string lights, and a diamond tip drill bit.
- 2. Clean the bottle thoroughly, paying extra attention to removing any labels or glue.
- 3. Carefully drill a hole near the base of the bottle to insert the LED light string. Remember to wear safety gear while drilling.
- 4. Feed the LED lights into the bottle through the drilled hole.
- 5. Arrange the lights evenly within the bottle for a balanced glow.
This idea could adapt to different holidays by varying the hues – warm whites for Christmas, eerie purples for Halloween or bright colors for Easter. It’s a fantastic way to light up and raise the mood of any festival.
Lighted Wine Bottle With Etched Design
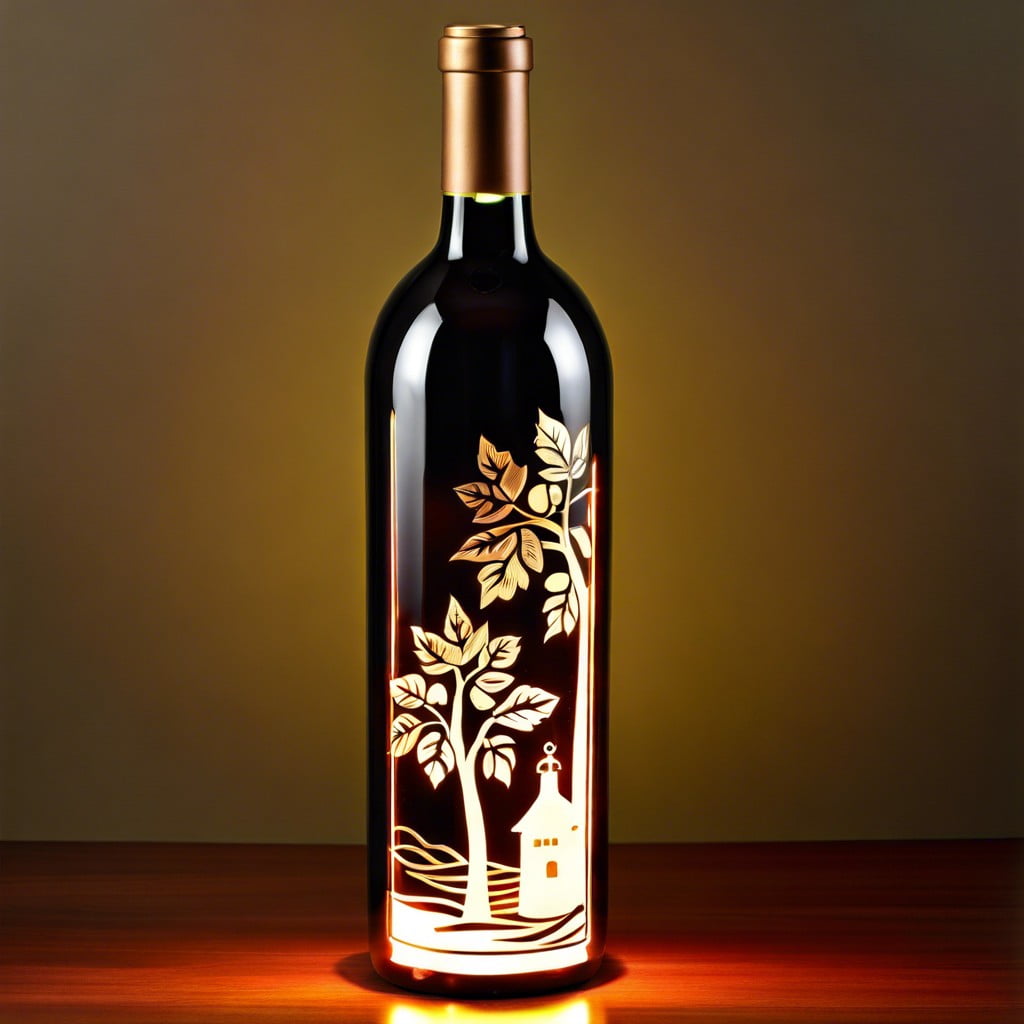
In creating a lighted wine bottle with an etched design, one takes the aesthetic appeal to a whole new level. Engineering this involves several steps:
1. Select an etching design: This could be anything from intricate patterns, monograms, to personalized messages. Designs should complement the bottle and the eventual display location.
2. Assemble the necessary tools: Typically, you’ll need an etching cream, a brush, protective gloves, and adhesive stencils.
3. Adhere your stencil and apply the etching cream: With gloves on, paint a thick layer of cream onto the stencil area.
4. Let it rest then rinse: After the recommended time of 10-15 minutes, rinse off the etching cream.
5. Insert lights: LED string lights work best due to their safety and energy efficiency. Choose lights that compliment your etched design.
6. Display with pride: Once lights are inserted, select a place of prominence to display and enjoy your newly transformed wine bottle.
Remember, safety first – please follow all instructions and precautions mentioned on the etching cream packaging. Lighted wine bottles with etched designs create a cozy glow, adding depth, and texture to any space.
Note: bottle size and light color can affect the final piece, so experiment with different elements for best results.
Wine Bottle Lantern
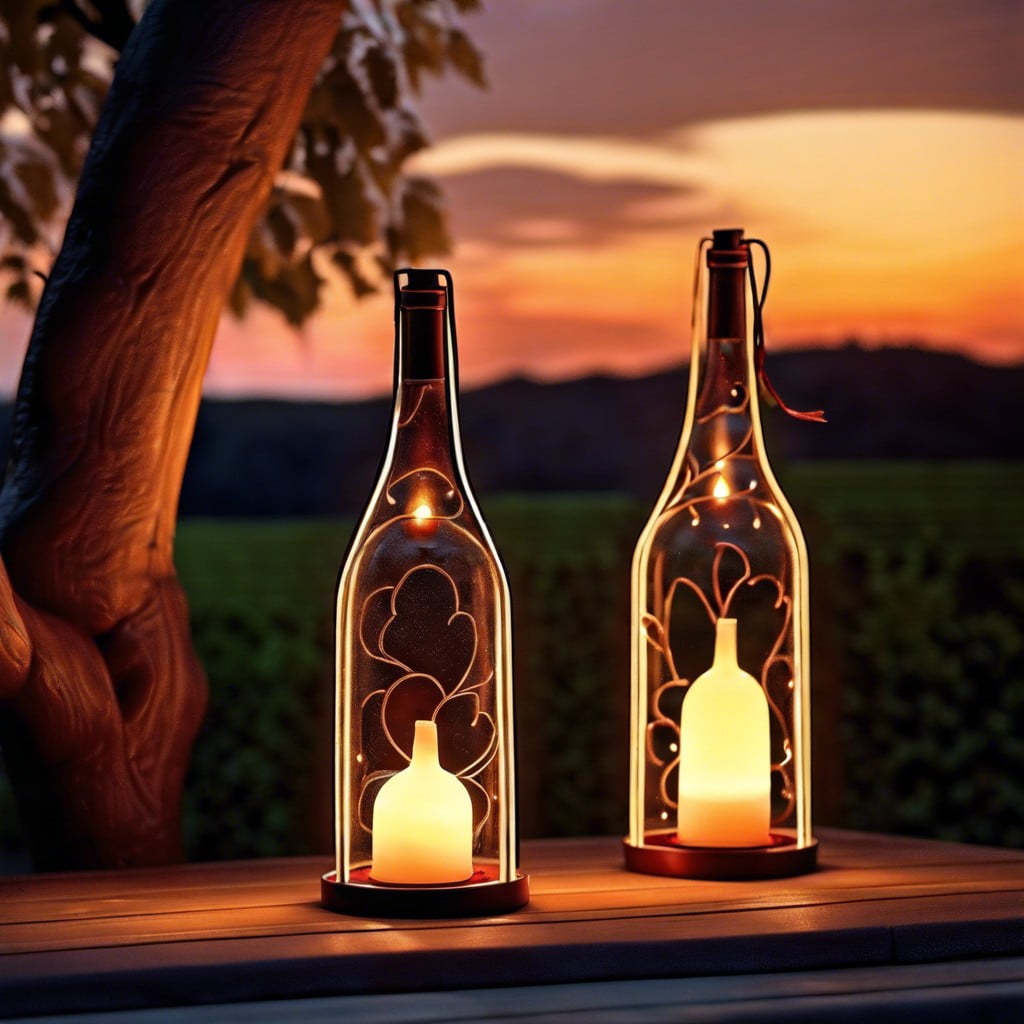
Crafting a wine bottle lantern might seem daunting but it’s a breezy process if approached correctly.
Start by stripping off the labels and cleaning the bottles.
Drill a hole in the bottom to accommodate the light cords.
File the hole to ensure smooth edges, avoiding any possible hazard.
Carefully drop a string of lights into the bottle.
Place the plug end into the drilled hole and connect it to the power source.
Now, choose a suitable hanging mechanism.
It could be a simple rope to give a rustic look or a sleek metal chain for a more finished appearance.
Attach it securely to the bottle’s neck.
Your wine bottle lantern is now ready to hang, casting a cozy glow while adding a unique touch to your décor.
Just ensure that the power plug is easily accessible for safety measures, and you’ll have the perfect outdoor light fixture for your patio or a whimsical addition to your indoor spaces.
Hanging Lighted Wine Bottle Candle Holder

To start creating this enchanting piece, choose a sturdy wine bottle and clean it thoroughly.
Next, drill a small hole near the base for the light cord.
It is advisable to coat the bottle with a translucent frost spray that will help diffuse the light from the candle, giving a softer glow.
Richly colored bottles or even simple clear ones work wonderfully for this project, each bringing its own unique touch.
Thread a string of LED lights through the drilled hole, filling the bottle.
Choose warm-colored lights to mimic the look of flickering candlelight for a cozy ambiance.
The charm of this craft lies in its hanging feature.
A strong, durable chain or thick rope will work best for hanging the bottle.
Attach the chain securely to the neck of the bottle.
Remember, safety is paramount.
Ensure all electrical cords and plugs are properly insulated and safe from any possible wine drips.
Once completed, this hanging light illuminates your space, creating a relaxing, romantic atmosphere.
Consider hanging it in your living room, dining area, or even outdoors for a touch of whimsy.
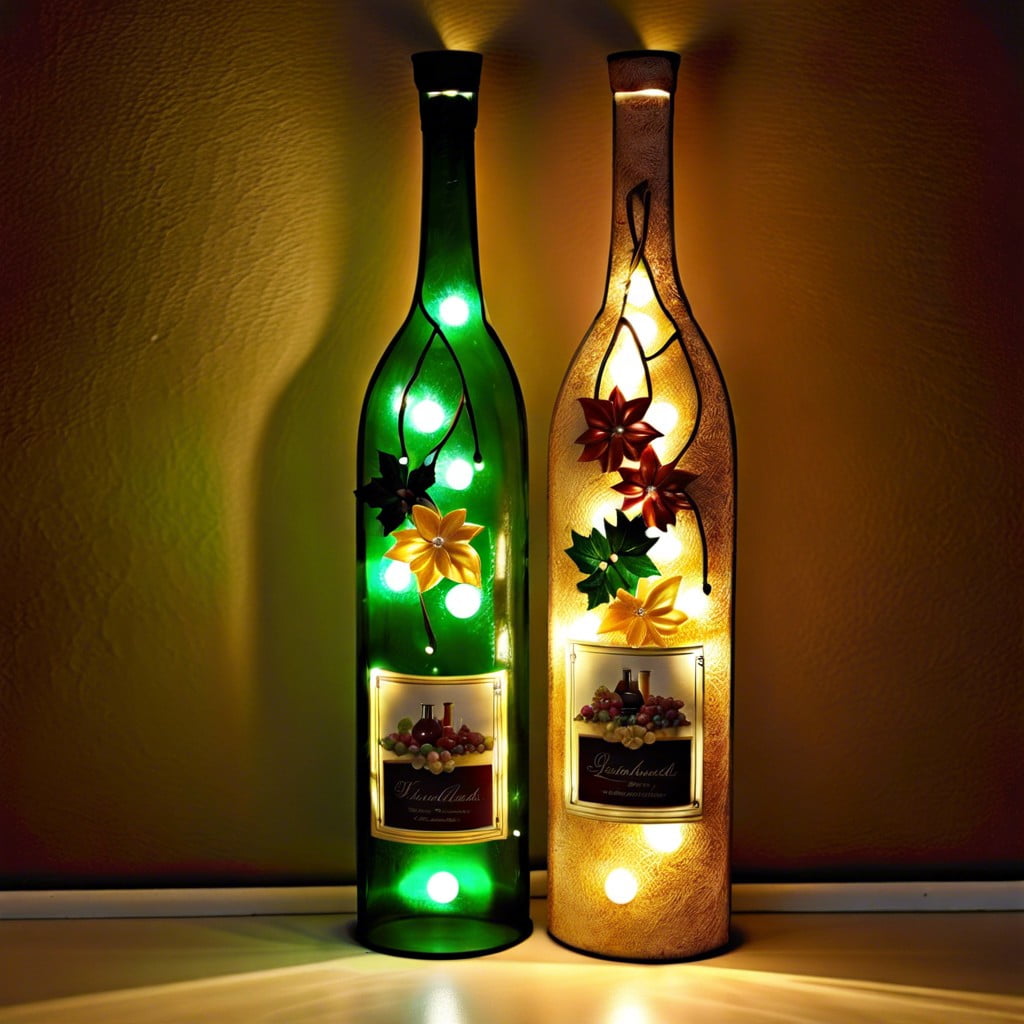
Painted Wine Bottle With Lights Inside
For a truly bespoke touch, consider incorporating artwork into your creation. Painting the exterior of the bottle can be a fun and expressive way to add personality. Acrylic paints are ideal as they adhere well to glass surfaces, come in a variety of colors and styles, such as metallic or neon, and add an extra layer of opacity to amplify the magical glow from the lights within.
Make your design as simple or intricate as you please. A single, solid hue offers a modern minimalist look or use a combination of colors and techniques for something more unique. Hand-painted florals, abstract patterns or stenciled quotes can add a touch of whimsy and charm.
Strategically place a strand of lights inside the bottle, opt for small LED lights for their ability to radiate ample light while being safe and energy-efficient. This will illuminate your painted design from within, creating an enchanting silhouette ambience that’s captivating in both day and night settings.
Outdoor Wine Bottle String Lights
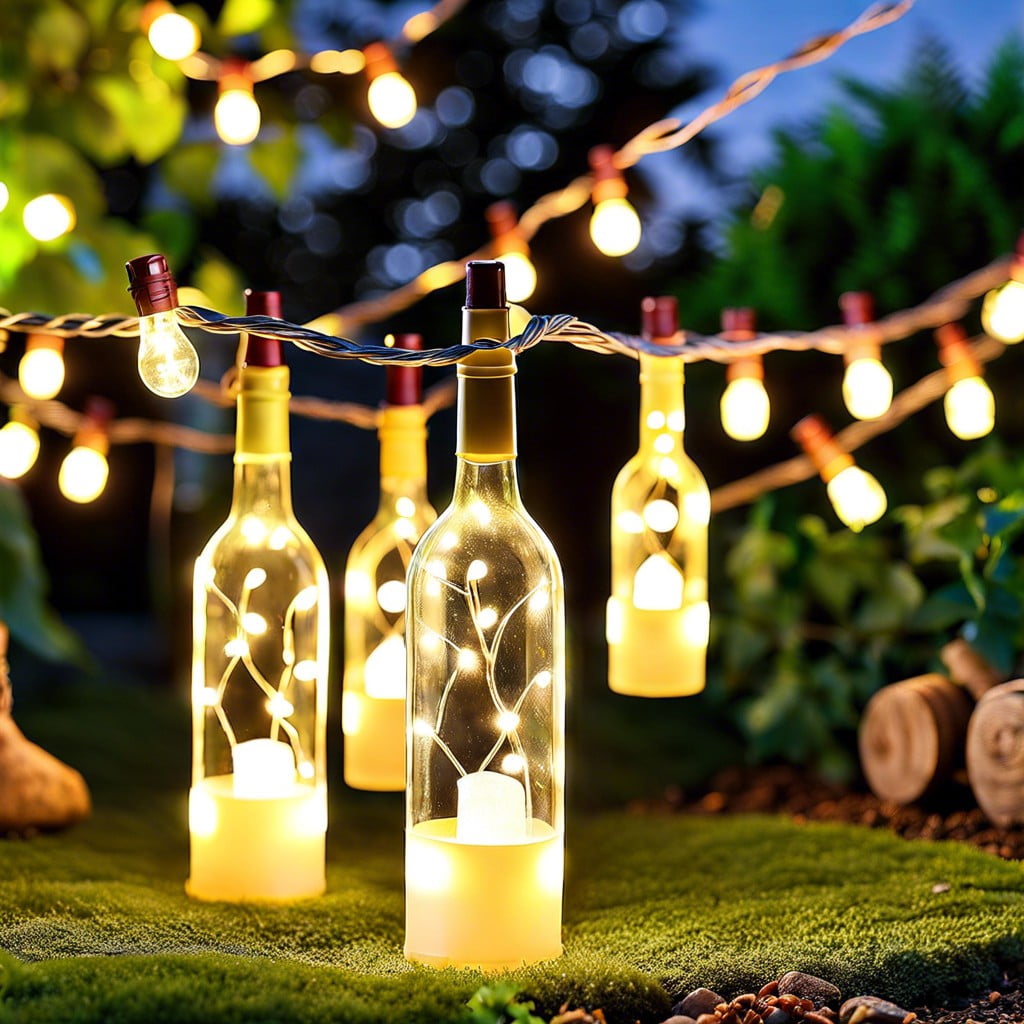
To bring a touch of elegance to your patio or garden, stringing outdoor wine bottle lights can work wonders. Here’s how they come together:
1. Bottles Preparation: Thoroughly clean used wine bottles inside out. Allow them to completely dry.
2. Drilling Process: Carefully drill a small hole at the base of each bottle. This hole will allow the passage of light strings.
3. Light Strings: Use waterproof LED lights for this purpose. Feed the light string into each bottle through the drilled hole.
4. Mounting Method: With the help of a strong, weather-resistant string or wire, connect the wine bottles together. Ensure a consistent space between each to achieve an appealing balance.
5. Hanging: Securely hang the string of wine bottles on a sturdy base like a tree branch or gazebo side. Ensure they are high enough to avoid accidental knocks.
Transform your outdoor space into a magical atmosphere with this design. It not only gives a second life to your used wine bottles but also creates a stunning lighting feature for events or casual nights spent outdoors.
Browse More
 Baking Soda and Vinegar Drain Cleaning: Simple Steps for a Clog-Free Life
 How Long Does It Take to Tile a Bathroom: Your Ultimate Time-Saving Guide
 Smelly Drain: Banish Odors with Easy Fixes
 How to Remove Bathroom Fan Without Losing Your Cool
 How to Remove Bathroom Vent Cover Without Losing Your Mind
Recap